Tips for photographing nudibranchs

Here are some tips to help you get better results photographing nudibranchs:

Try to get down low – It’s always a good idea to get down as low as possible, as we learned in TT&T#2 (avoid helicopter shots), but how can we do this in practice? Well, we have to find subjects in the right position. If a nudibranch is just sitting in the sand it’s often very difficult or even impossible to isolate the subject from the background. Look for opportunities to shoot nudis at least horizontally (we can sometimes achieve this with getting down very low), or even better, shoot slightly upwards. Sometimes the dive guides here will not show you a nudibranch which is sitting in a perfect position, because they showed you two or three of them already and there might be something “more interesting” (rare) in that area. Getting good images is not so much about capturing the rare species, it’s more about good composition. It’s better to have a great photo of a common species than a poor or mediocre shot of a rare one. If you see a nudi sitting on a hydroid stick, a rock or coral where you can separate the subject from the background and not include the sand for example, go for it and take a few shots. Remember that the focal point should be the rhinophores (those cute little ‘horns’), or, if it is a species with eyes such as Costasiella kuroshimae (the ‘sheep’ nudi) then it’s important to have the eyes in focus. If you can convey something to the viewer about nudibranch behavior (while adhering to the principles of good composition) this also makes your image more interesting – examples include photos of nudis eating, mating, sniffing the water column or laying eggs. Nudibranchs are most photographers’ favorites. Why? Because they don’t move that fast and this makes it possible to try out different techniques while photographing nudibranchs.

Here are some examples of nudibranch shots (good and bad ones):
SaschaJanson_20141021_4327

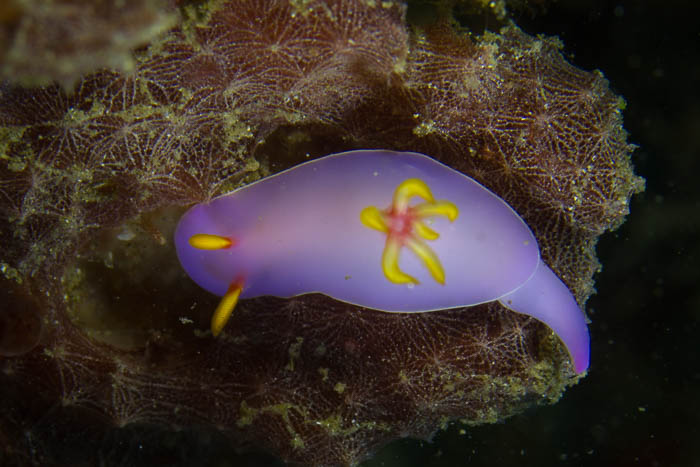
This is a poor shot of a very pretty nudibranch, the Hypselodoris bullocki. Shot from the top, no “eye contact” and not separated from the background.
 SaschaJanson_20141017_3799

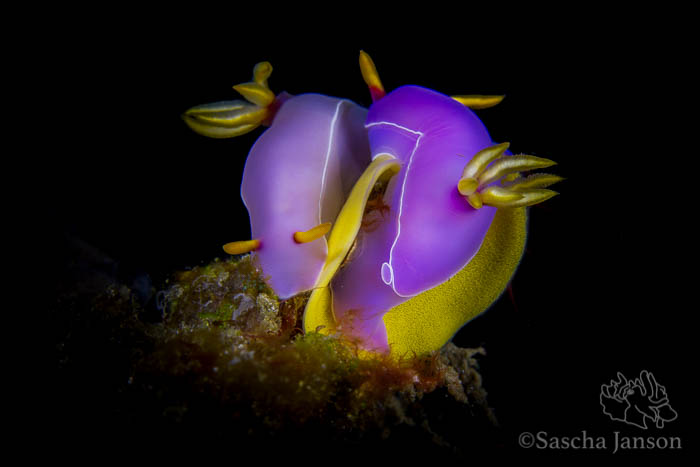
Same nudibranch (Hypselodoris bullocki), but interesting angle, “eye (or rhinophore) contact”, made to stand out from the background (by getting down very low and minimizing ambient light) and some behaviour (laying eggs/mating) going on.
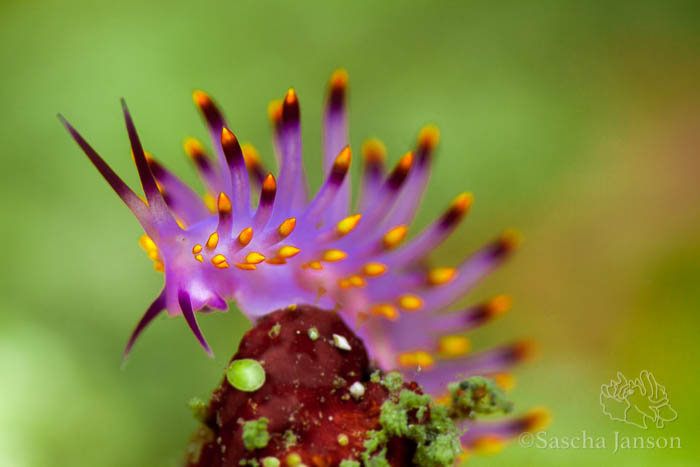


Flabellina rubrolineata posing in the Lembeh Strait

Flabellina rubrolineata on top of a little rock, made to stand out from the background by bokeh (out of focus) technique.
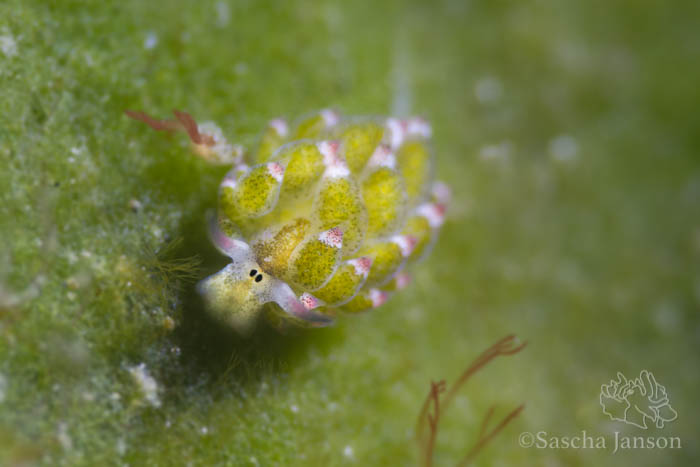

 SaschaJanson_20141023_4412-3

Costasiella kuroshimae (the ‘sheep’ nudi) – “eye contact”, made to stand out from the background by bokeh technique.
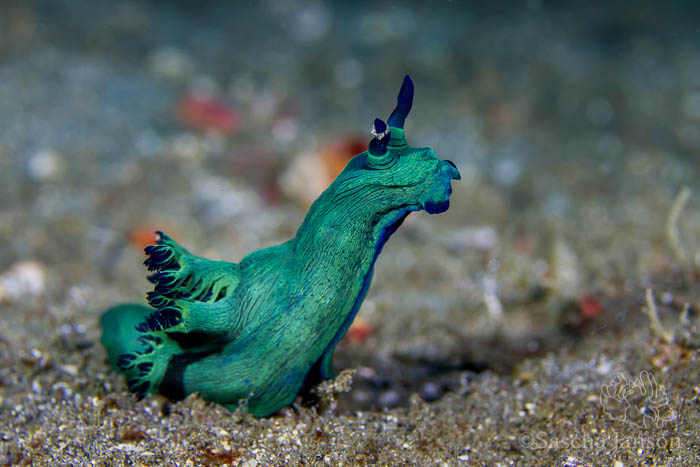

SaschaJanson_20140816_9151

Nembrotha milleri sniffing the water column, made to stand out from the background by bokeh technique.


If you want to create a bokeh (out of focus background) effect, you have to open up the aperture. Settings depend on your lens setup, but frequently used settings are somewhere between f4.5 and f11. This is useful for eliminating ugly or busy backgrounds commonly found here in Lembeh such as sand and rubble. Here are some more example shots:


Nembrotha chamberlaini sucking on a tunicate
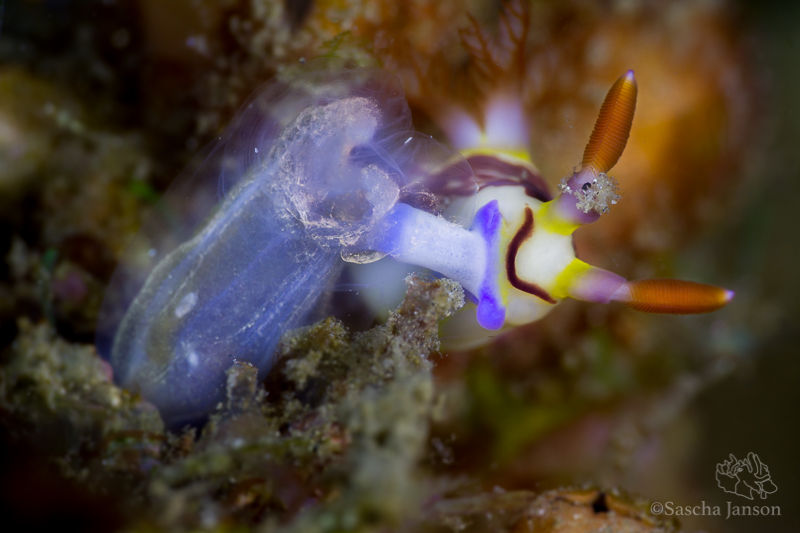
SaschaJanson_20140915_1082

 f11 – 1/200sec – ISO 160 – 1xSOLA 4000, 1xSOLA1200 – Canon 7D – Subal CD7 – 60mm macro


Gymnodoris rubropapulosa attacking a Hypselodoris whitei (watch the surprising video here)
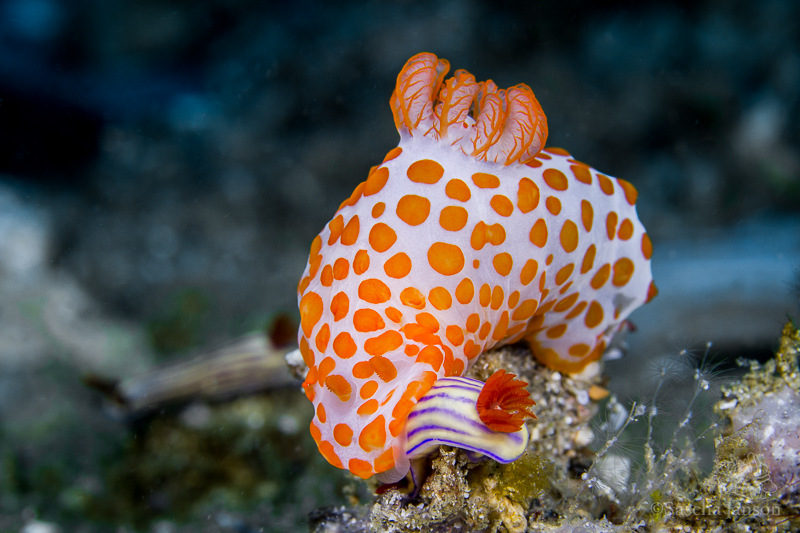
SaschaJanson_20141028_4872

f10 – 1/60sec – ISO 160 – Canon 7D – Subal CD7 – 60mm macro – 1xSOLA4000, 1x i-Torch Pro7


Hypselodoris bullocki abstract shot
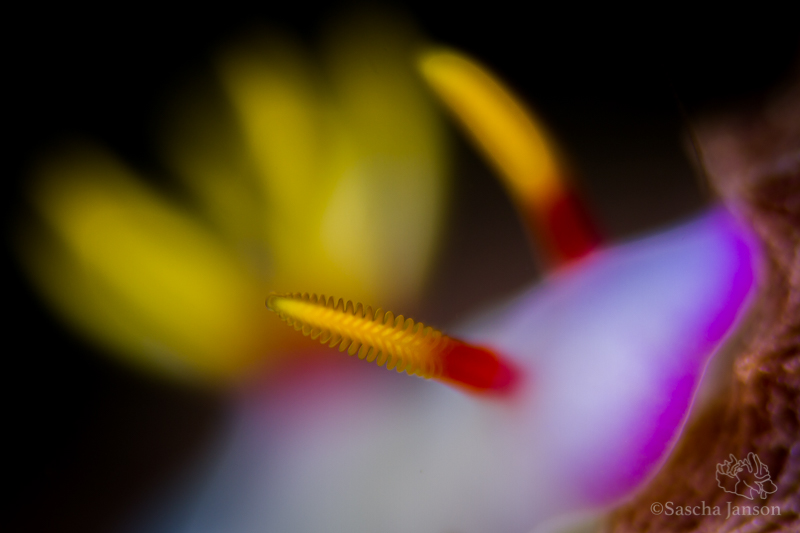
SaschaJanson_20150317_1924

f5.6 – 1/320sec – ISO 160 – Canon 7D – Subal CD7 – 100mm macro – Kenko 1.4 Teleconverter – 1x SOLA 4000, 1x SOLA 1200


Shooting with this shallow DOF (depth of field) is sometimes very tricky. It’s very easy to miss that crucial focus point and the image doesn’t look that good if the wrong part of the image is in focus. For nudibranchs we usually aim for the rhinophores to be in focus, as we learned in TT&T#16, or at least the one rhinophore closest to the viewer. The next image could be more powerful if both rhinophores were in focus in order to better distinguish them from the very similar-looking cerata. In the above image however, having just one rhinophore in focus ‘works’ because its eye-catching colour, detail and texture makes it stand out against the very blurry background.


Phyllodesmium serratum – the rhinophore on the right in this photo (or the nudi’s left rhinophore) is not in focus
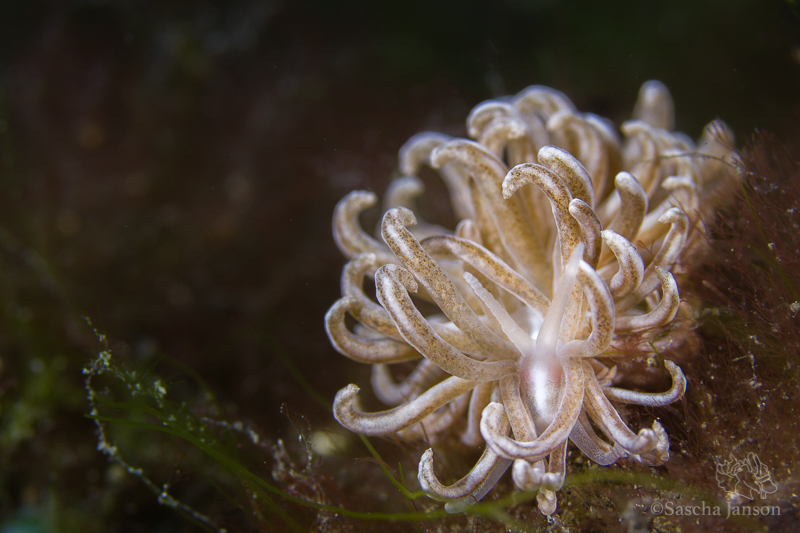
SaschaJanson_20141023_4418

f5.6 – 1/200sec – ISO 160 – Canon 7D – Subal CD7 – 60mm macro – 1xSOLA 4000, 1x SOLA 1200
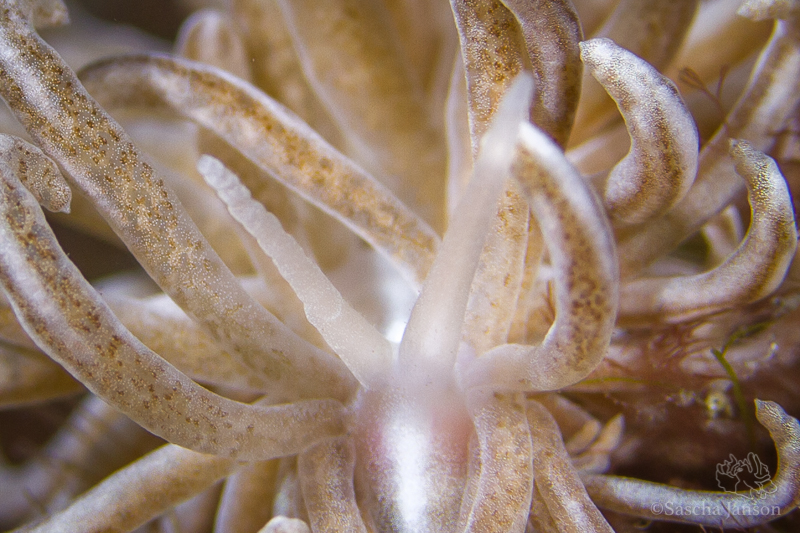
SaschaJanson_20141023_4419b

The above image at 100% – the right rhinophore is just a tiny bit further ahead of the left one, but at f5.6 and very close distance that’s enough to render it out of focus.


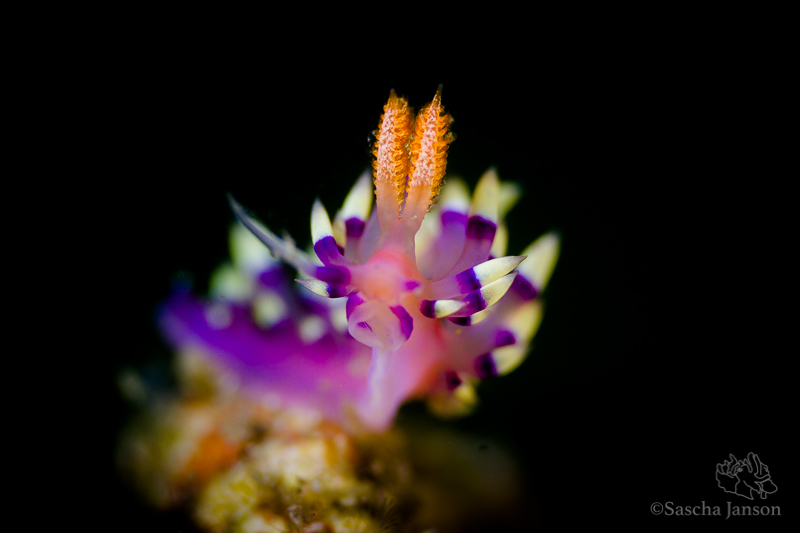
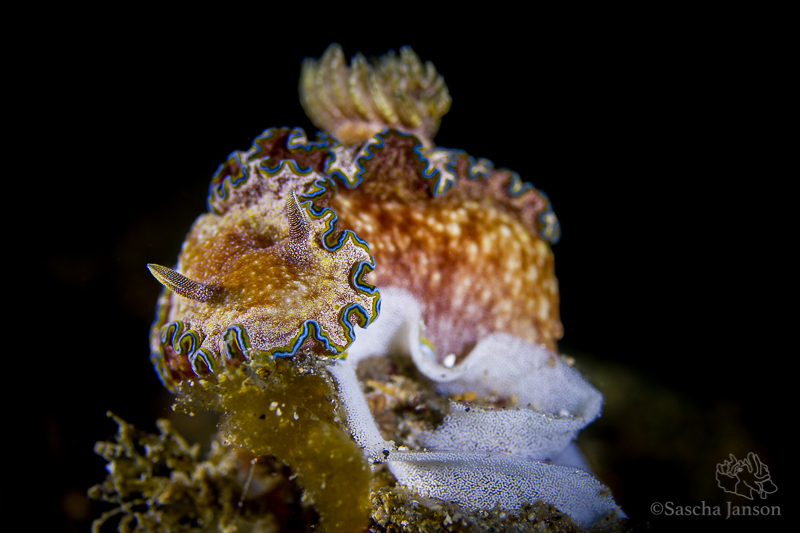
If you’re shooting with constant light, you can even combine the shallow depth of field with a dark background by using a very fast shutter speed (due to synchronization speed limits not possible with strobes).


Flabellina exoptata on hydroid
SaschaJanson_20140922_1658

f5.6 – 1/800sec – ISO 160 – Canon 7D – Subal CD7 – 60mm macro – 1xSOLA 4000, 1x SOLA 1200


Glossodoris cincta laying eggs
SaschaJanson_20141017_3778a

f5.6 – 1/1000sec – ISO 160 – Canon 7D – Subal CD7 – 60mm macro – 1xSOLA 4000, 1x SOLA 1200


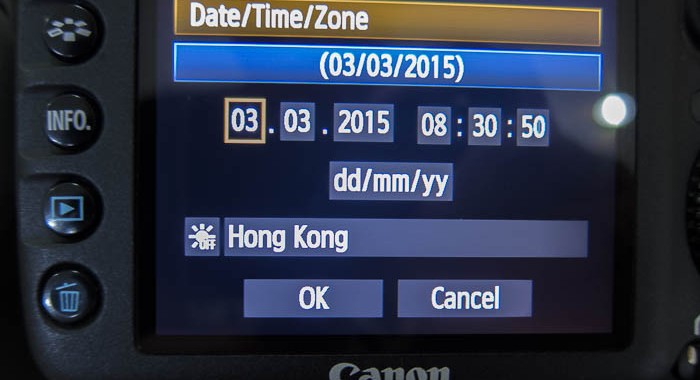
Set the correct time on your camera after traveling!

It is important to set the right time and date on your camera after you change location. It is always good to know when you took that special shot whether it was sun rays in the right position, fishes mating or other animal behaviour you’re trying to capture which may only occur at a specific time of day.

If you look at your images later you will always know exactly what time you took that shot of the manta with the sun rays at the perfect angle, or of that fan on the wall. It might be crucial to know what time those frogfishes mated – if you set the right time on your camera this will be easy, because it gets embedded in the metadata of every image. There will be no speculation about when the sun is right, you will know with 100% certainty by looking at your images, and you can then decide to go back to a particular location at exactly the same time, or try at a later or earlier time if the sun wasn’t right.

If you don’t check the date at all, it could even indicate the wrong month or year, which could lead to problems when trying to submit your image to a photo contest.

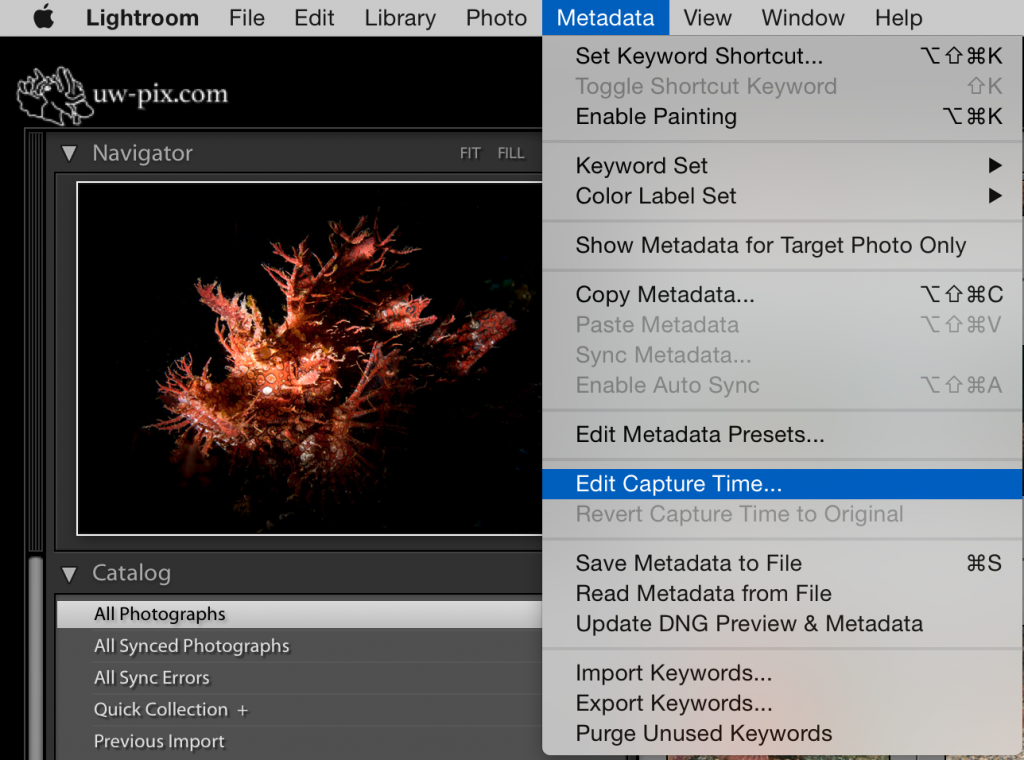
If the time stamp on your images is wrong and you’re using Adobe Lightroom, you can adjust the capture time like this:

In the Library module choose:

Metadata – Edit Capture Time…

Lightroom capture time3

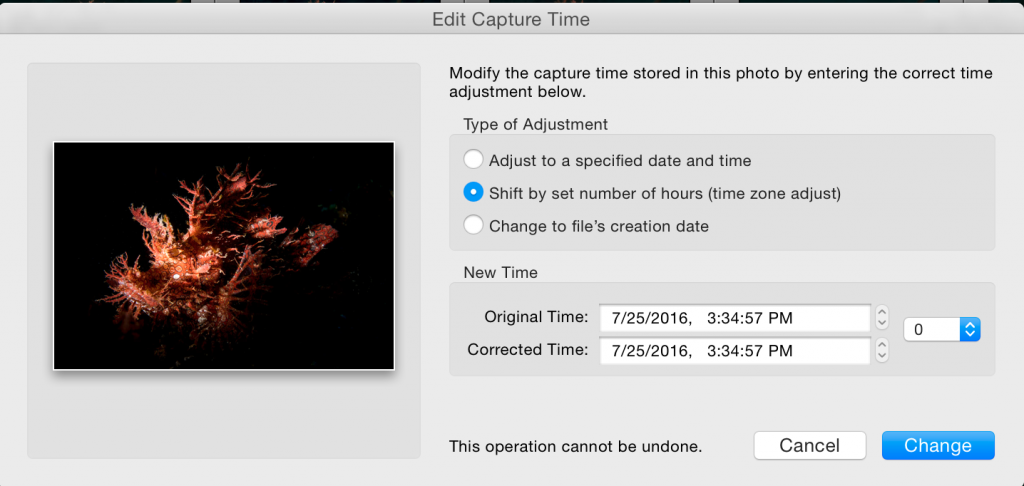
You then have different options, if you just didn’t set the time difference from your home location, you can choose: Shift by set number of hours (time zone adjust) and just dial in the number of hours – and then click change.

Lightroom capture time01

If the time is completely wrong (because of a camera reset), you can Adjust to a specific date and time.

Move you strobe(s) or Light(s) around

I see it all the time. Photographers don’t even touch their strobes for a whole dive, or even worse, for all their dives. But it’s so easy to get different results when we move our lights around. Macro lighting is quite easy, yet still complex. We can change the look of an image a lot by just changing our strobe position(s). There is no one recipe for good results, it all depends on the situation. Play with the shadows and see what you like best.

Sometimes I like to create strong shadows, this often works better with only using one source of light (strobe or continuous light).

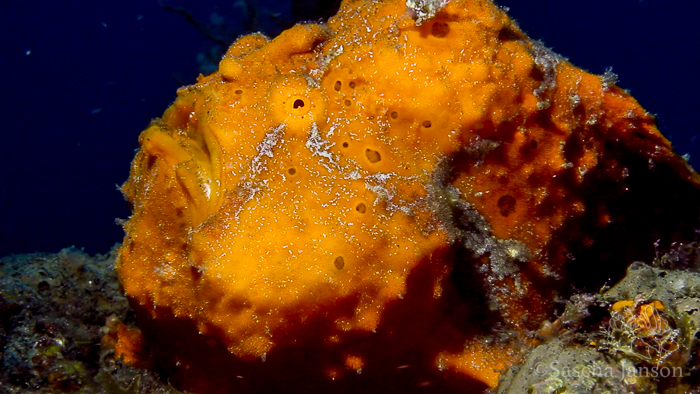
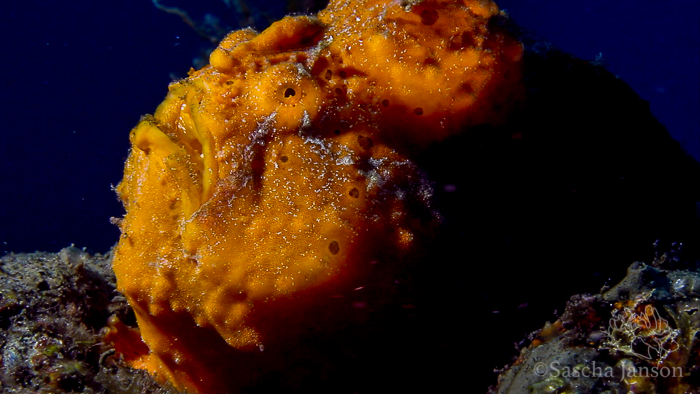
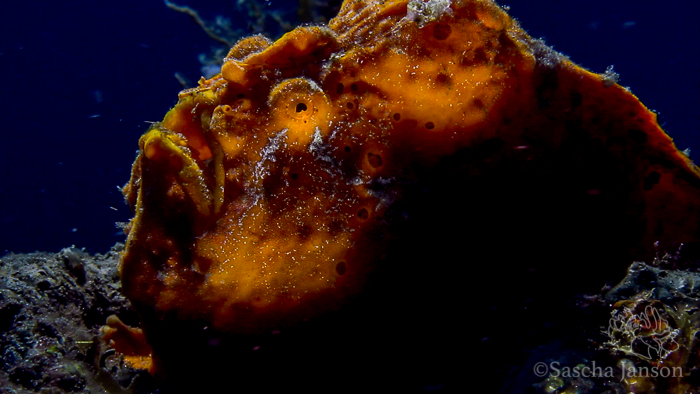
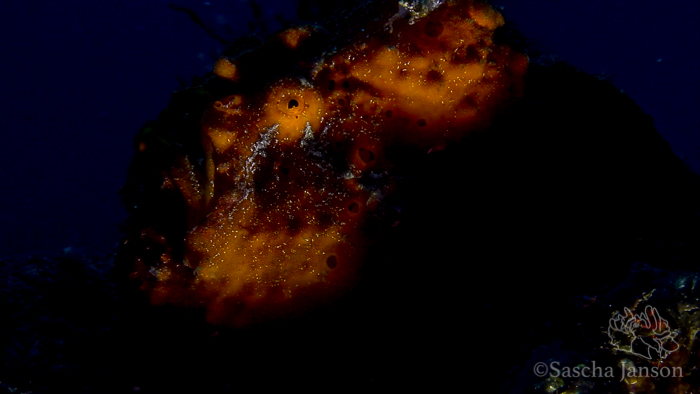
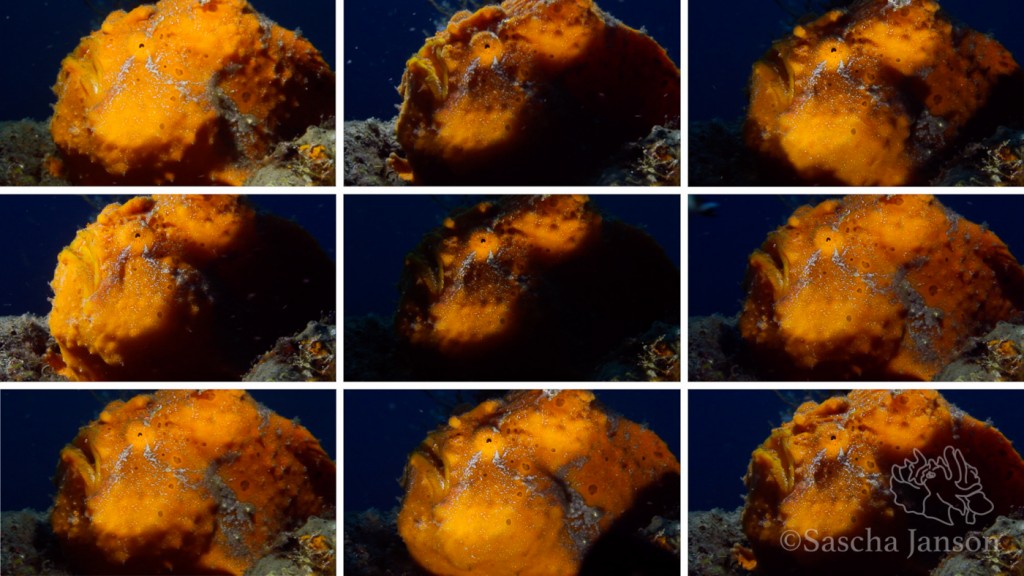
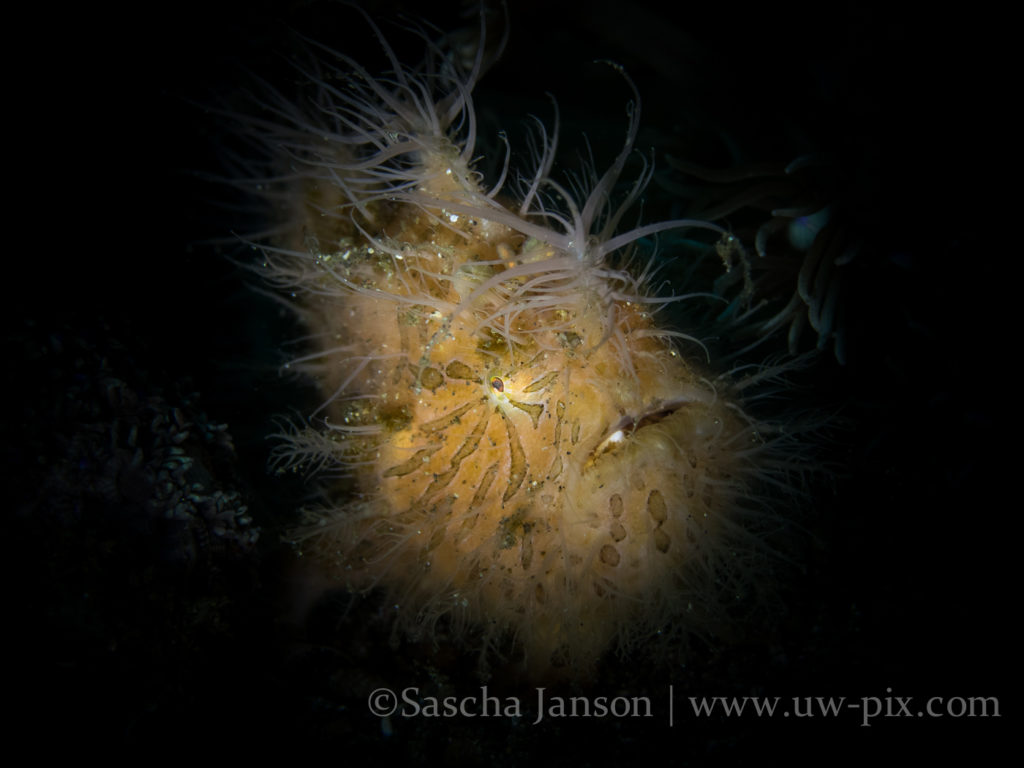
Take this example of a frogfish here in Lembeh. I didn’t change the position or settings on the camera, I only used one light (1x SOLA 4000), but I still got many different images of the same subject just by moving the light around.

move strobe04

Painted frogfish lit up from the top left. This is an example of fairly standard lighting.


move strobe03

Painted frogfish lit up from the left. Note how it is very similar to the one above, but the tail of the frogfish is not lit up.


move strobe02

Painted frogfish lit up from the top left but this time I positioned the light further behind the subject to get a backlighting effect.


move strobe05

Painted frogfish lit up from the bottom right – the coral makes a nice shadow on the body and only a tiny bit of the frogfish gets illuminated. That gives a nice spooky effect.


move_strobe

Some more examples of the same frogfish. It’s up to you which one you like best. There is no right or wrong!

You can also watch the video how I shot the frogfish here:


When will you start moving your strobe(s)/light(s)?

Critters of the Lembeh Strait | Episode 02 – 2015

Attention divers: some very unusual, weird and beautiful critters inside! A sea moth, tozeuma shrimp with eggs peeking out (can you spot them?), a tambja nudibranch with a surprise hitch-hiker on its backside, a close-up of the startlingly beautiful sand-diver’s eyes (like rays of sunlight) and more Lembeh surprises are featured on this newest video release

Shooting RAW Files vs. Shooting JPEG Files

If you want the best image quality possible, shoot in RAW!

Raw vs. JPEG? Why does my JPEG image look better than my raw image? Do I have to shoot raw and JPEG? – There are still many photographers undecided which format to use, this article should help you to make a decision.

Many digital cameras today, including both DSLRs and higher end compact cameras, give us the option of saving our images as either raw files or JPEG files or both, raw & JPEG files at the same time.
Every time you press the shutter the camera takes a picture and saves it to the memory card. If the camera saves that picture as a JPEG file, a lot of data contained in the original file gets thrown away in order to get a reduced file size. A lot of this detail is lost forever when shooting in JPEG.
When shooting in raw format, all this detail is saved to the memory card and we have a lot more information to work with. As a result we can push the images a lot further than we could with JPEGs. Little mistakes we made in relation to exposure and white balance settings can be corrected without loosing detail, giving us the flexibility to produce images of the finest quality.
A raw file is like taking the original film negative into the dark room and developing the photo yourself, with complete control over the final result. Raw files are often referred to as digital negatives, and we use programs like Lightroom or Photoshop as a digital darkroom to process the raw files and convert them to JPEG, TIF or PSD before it can be published or printed.

Here’s one example of how you can get details back from a raw file, which are lost in the JPEG file:


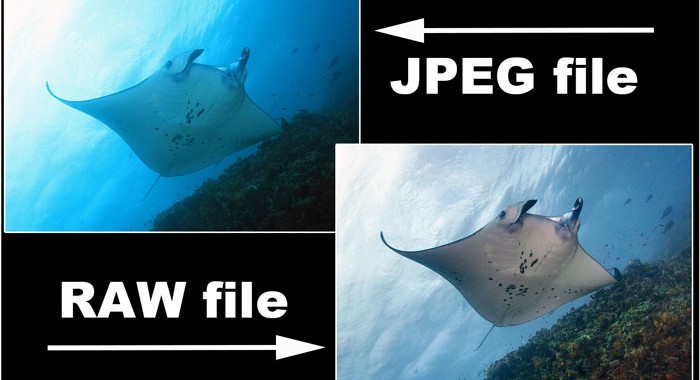
When I was shooting this manta ray in Komodo, the ray was too far away and my strobes didn’t really do anything (other than creating some backscatter). When I tried to process the image in Lightroom, all I could do with the JPEG file was this – the image is very blue, the water on the left is totally burned out and there is absolutely no color or light in the reef.


Because I recorded RAW & JPEG at the same time, I was able to get some of the details back with the raw file. With a simple white balance and a little processing in Lightroom I managed to get an acceptable image.

Of course it would have been better to get it right in the first place, but sometimes it is impossible. The Mantas on that day in Komodo were just very skittish and didn’t want to come close. This image was shot in 2011 while diving on MSY Seahorse. This was the last time I recorded JPEG & RAW images at the same time. After that trip I set my camera to record only RAW. When will you make the change?

If you don’t already use Adobe Lightroom, I strongly recommend using it. It does not only let you process your raw files, it will also help you getting organized with your images. Adobe Lightroom is available for MAC and PC.

There is the option of getting Lightroom and Photoshop as a bundle with the Adobe Creative Cloud Photography plan (Photoshop CC + Lightroom) for $9.99/month, which I find is a pretty good deal, given that you will always have the newest version of Photoshop and Lightroom.


Focus stack in Photoshop – Tutorial

In some situations we end up having trouble getting everything we want to be in focus. It can be for various reasons, for example not having enough light to close the aperture. If that happens there is still a way to get around that in Adobe Photoshop. It’s called focus stack.

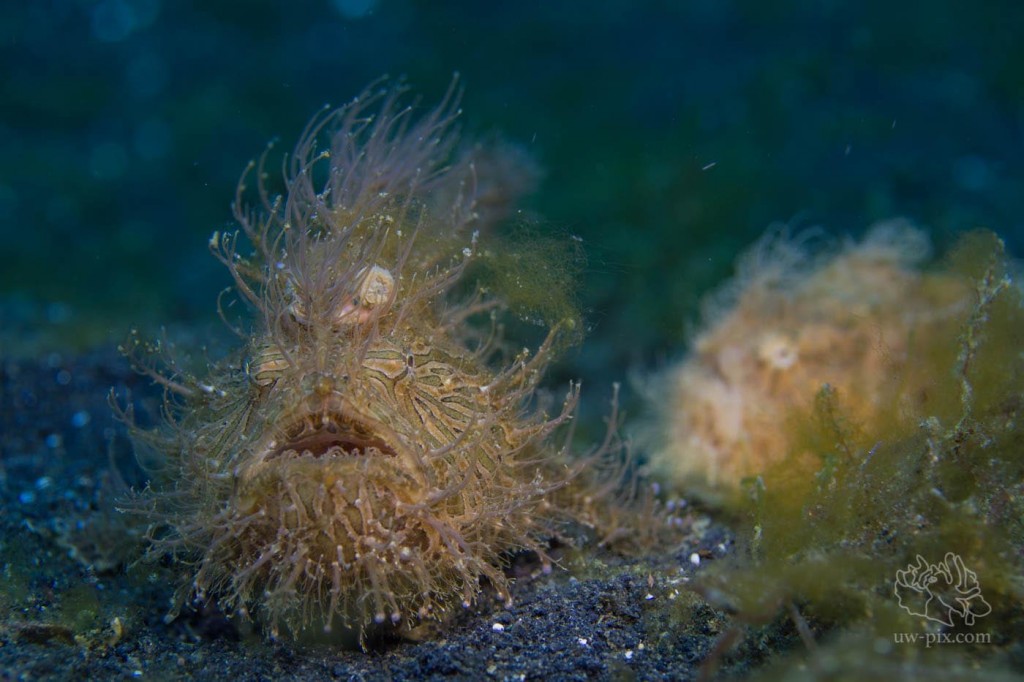
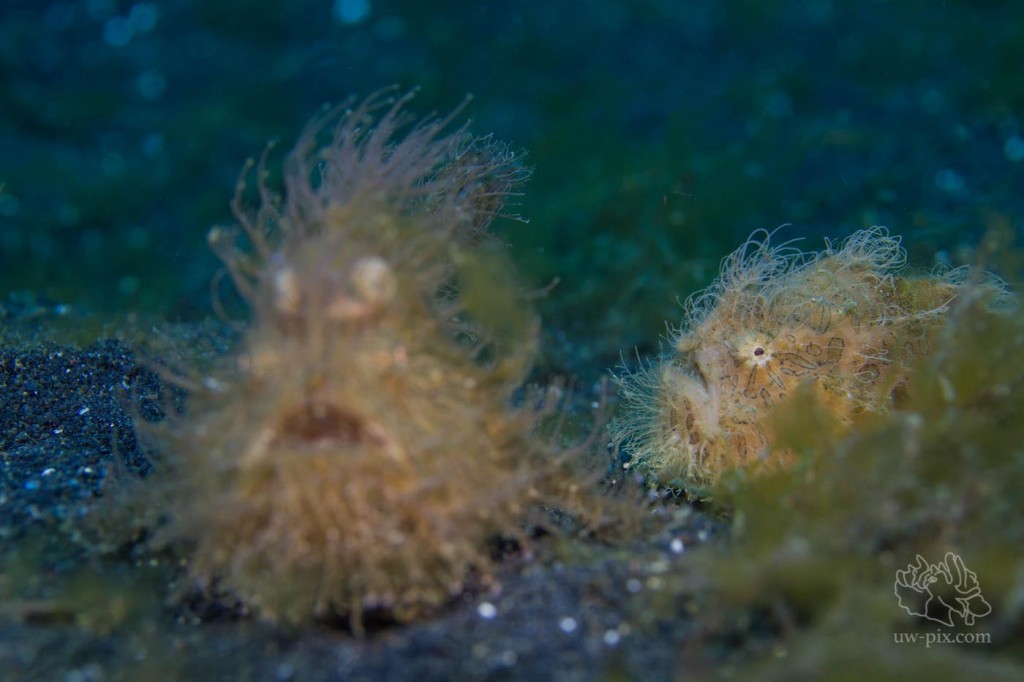
Here’s what you can do if you shoot multiple (in this case 2) images of the same scene with different subjects in focus:

©SaschaJanson_20141014_3568a

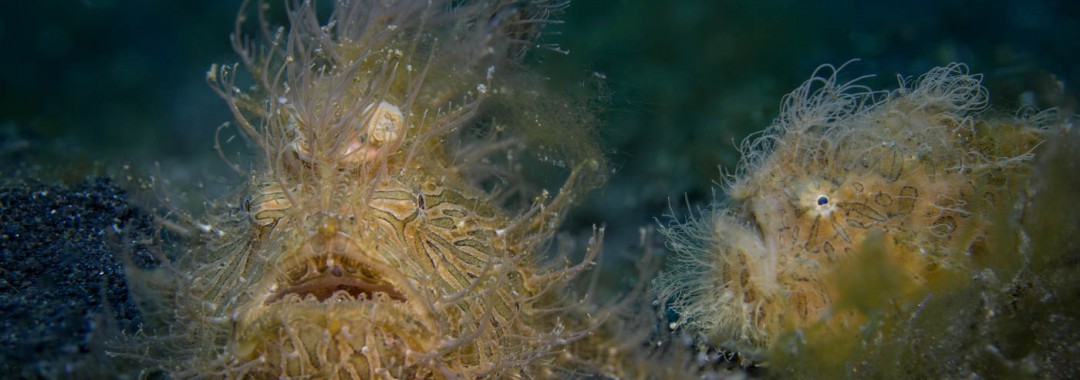
In this image the frogfish in the front is in focus, but the one in the back isn’t… (F5.6, 1/200sec, ISO 160)

©SaschaJanson_20141014_3573a

In this image the frogfish in the back is in focus, but the one in the front isn’t… (F5.6, 1/200sec, ISO 160)

Frogs

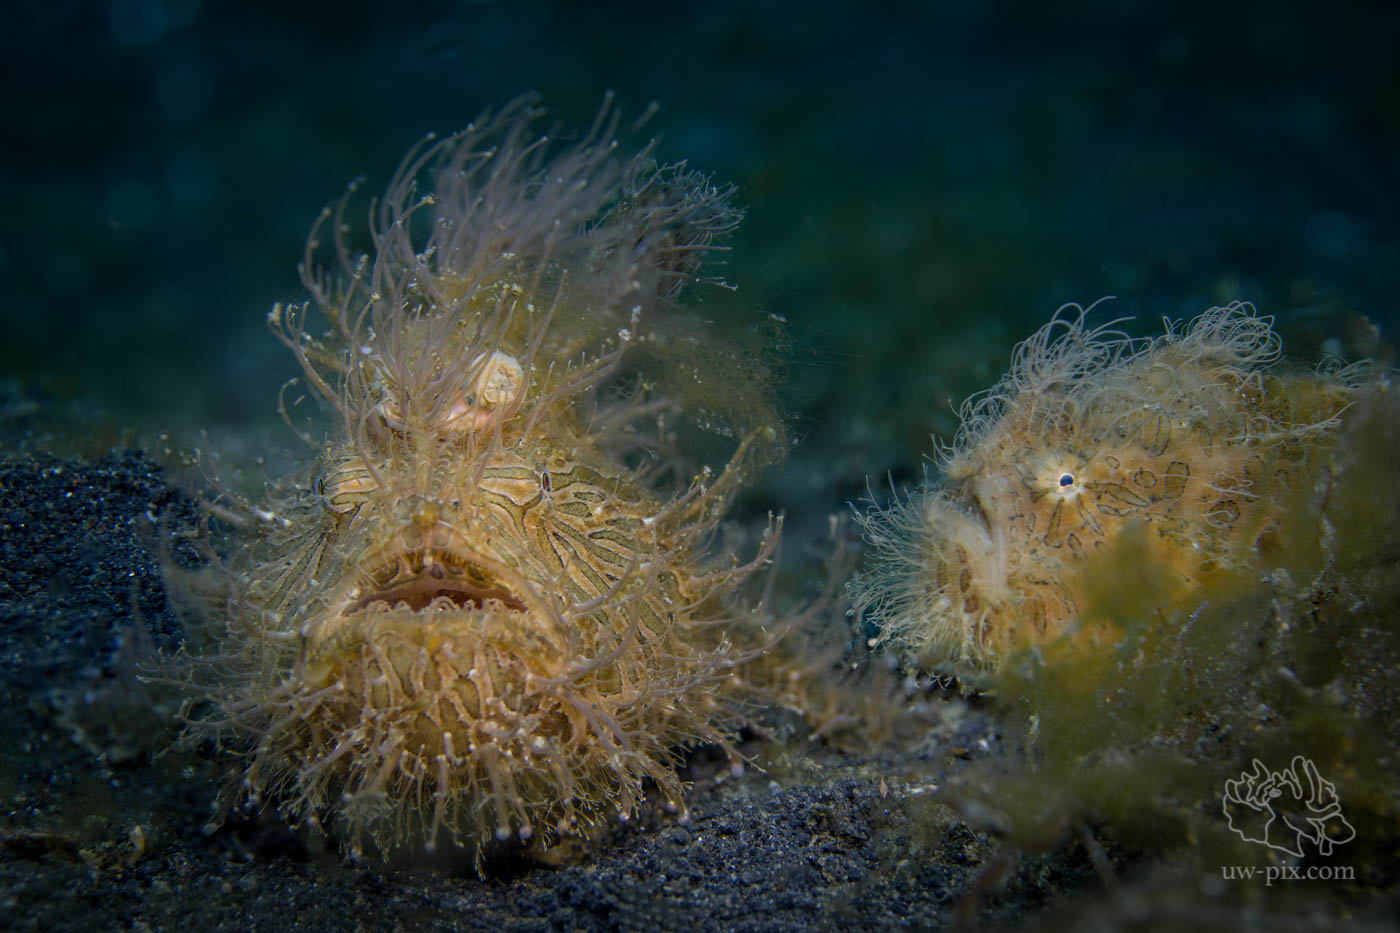
Focus stacked images – both frogfish are in focus ! (F5.6, 1/200sec, ISO 160)

Here’s how you do it:

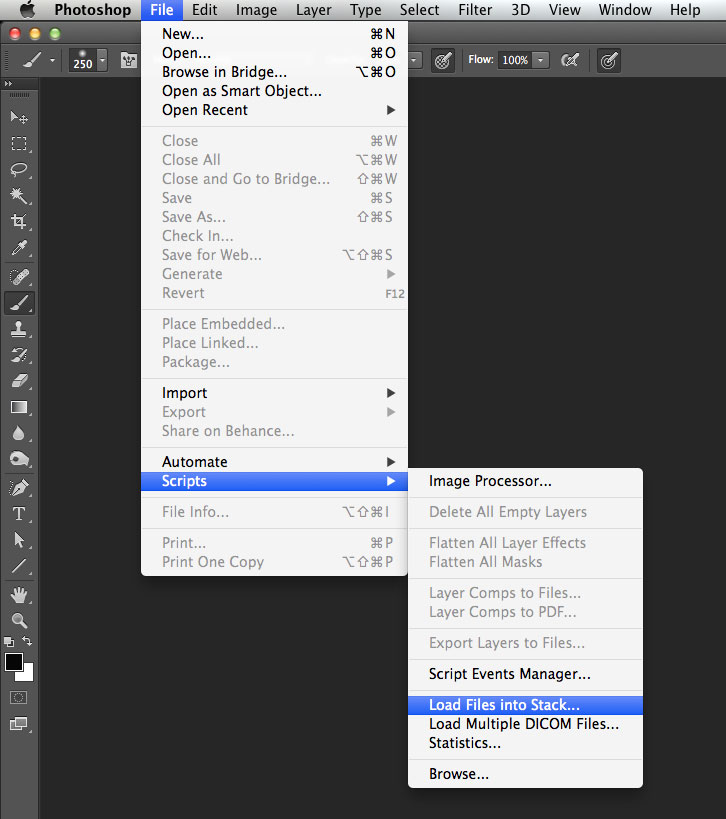
Open Photoshop and go to Edit – Scripts – Load Files into Stack…

Focus-stacking-1

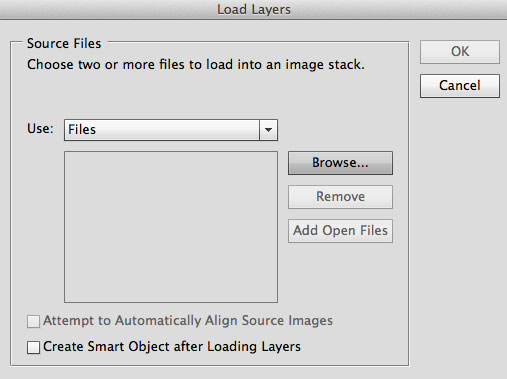
then select your files with clicking Browse

Focus-stacking-2

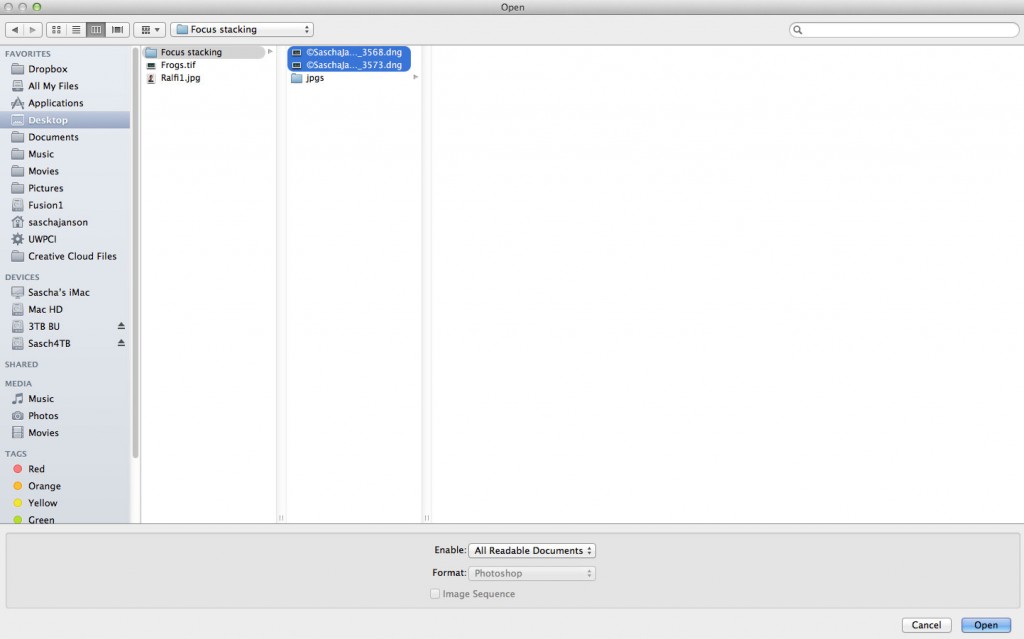
Select your images and click Open

Focus-stacking-3

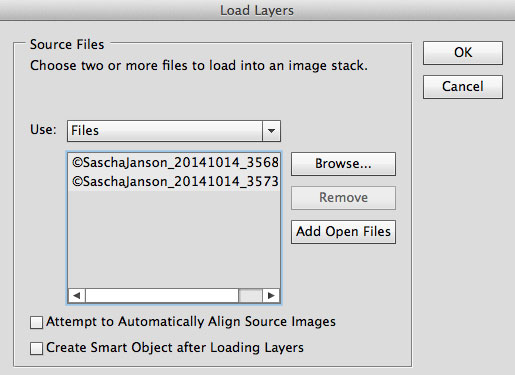
then click OK

Focus-stacking-4

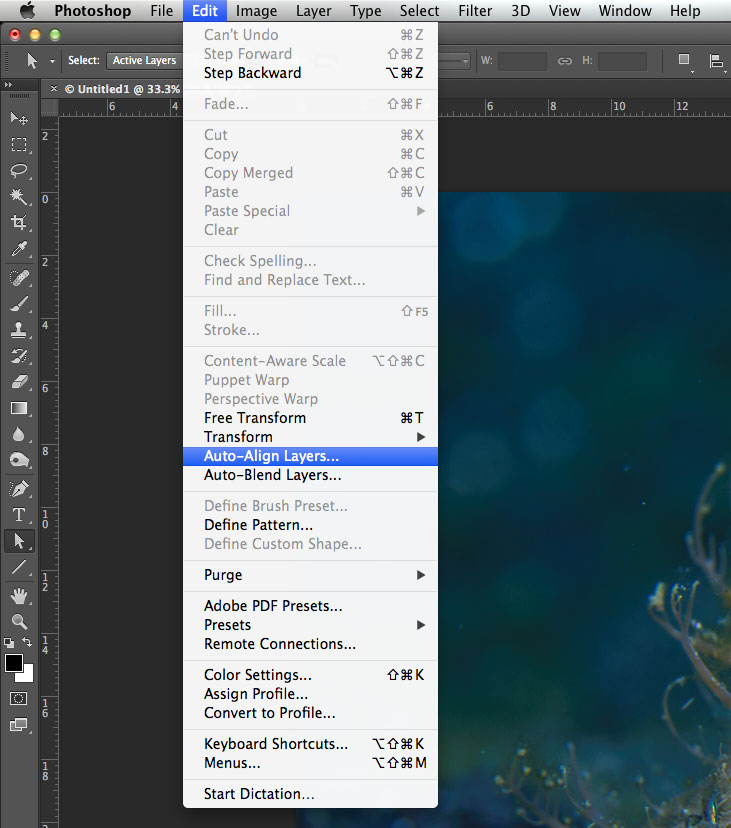
Then go to Edit – Auto-Allign Layers…

Focus-stacking-5

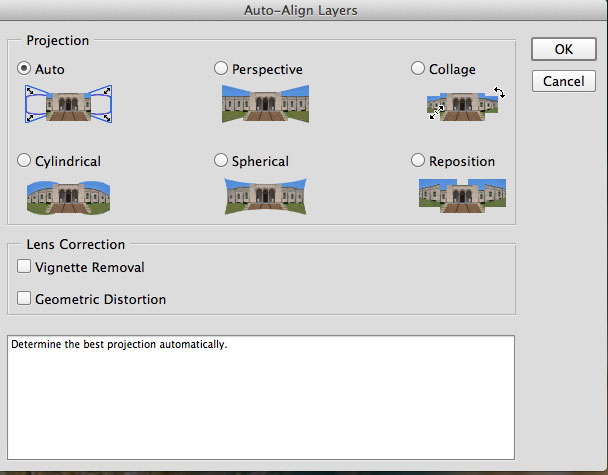
usually Auto does the right thing, so just keep the default Auto setting and click OK

Focus-stacking-6

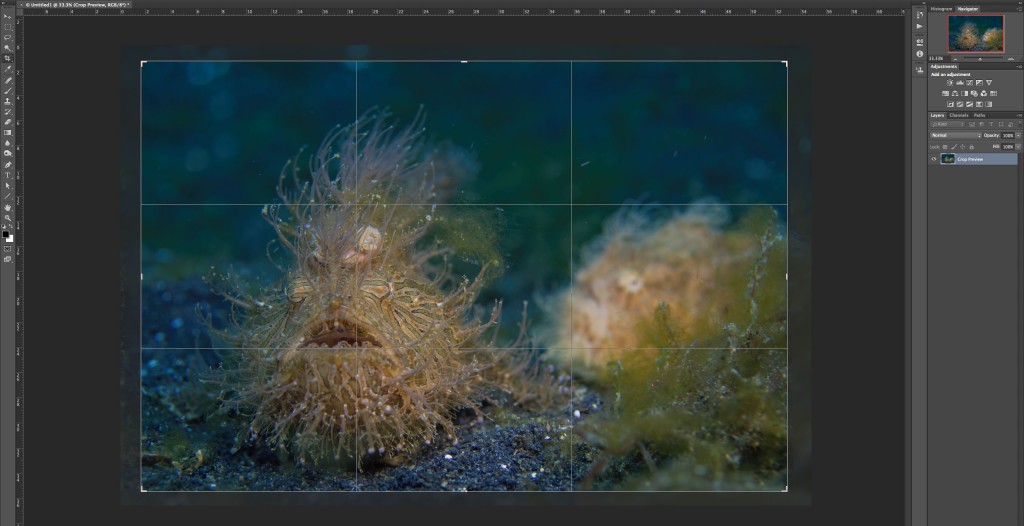
Now you’ll have two (in my case) images aligned up nicely and you can use the Crop Tool, to crop the image slightly to get rid of unwanted pixels.

Focus-stacking-7

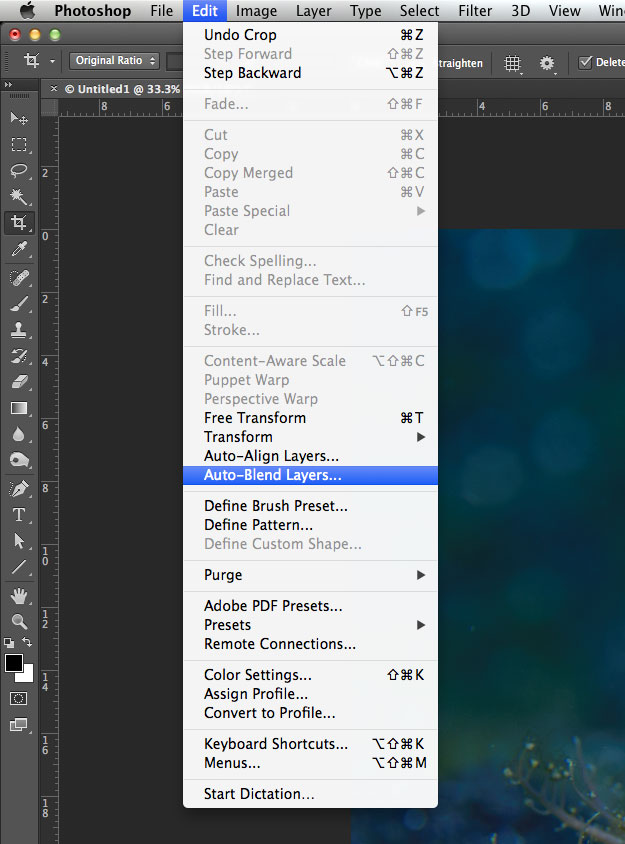
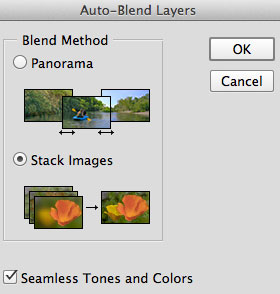
After that go to Edit – Auto-Blend Layers…

Focus-stacking-8

Photoshop detects automatically if the blending mode should be Panorama or Stack Images and you just click OK

Focus-stacking-9

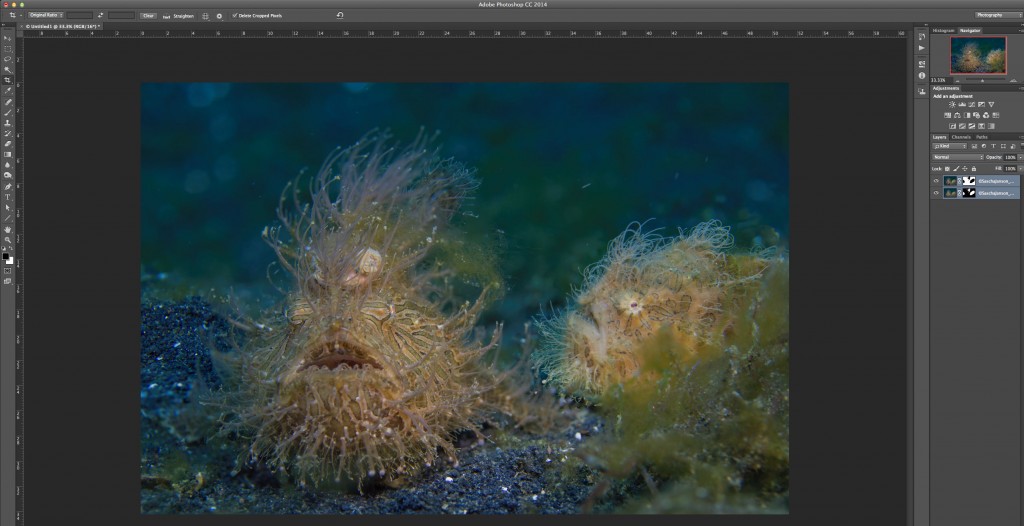
and here is the result – stacked images, with both frogfish in focus…

Focus-stacking-9a

a tiny little bit of tweaking in Lightroom and here’s the final result:

Frogs

Adobe Photoshop and Adobe Photoshop Lightroom are available as the Adobe Creative Cloud Photography plan (Photoshop CC + Lightroom) for 9.99/month only.


Critters of the Lembeh Strait | Episode 01 – 2015

Here’s a new episode of critter awesomeness. Watch for incredible close-ups of charismatic animals such as the blue-ring octopus, ornate goby, and juvenile star puffer fish – you can see their eyes moving, their breathing and every movement they make! There’s also spectacular footage of an embryonic flamboyant cuttlefish pulsating within its egg sac and plenty of rare and colourful nudibranchs that resemble bizarre works of surrealist art. Enjoy the spectacle! All the Critters of the Lembeh Strait say “HI”.

Underwater settings for Canon S120 / G7x and Macro Photography

These are suggestions of settings for the Canon Powershot S120, but the settings work as well for the Canon Powershot (G15 / G16 /G7x / S110) cameras for Underwater Macro Photography.


For shooting with strobe(s), I recommend using MANUAL mode:

F8.0 (for maximum depth of field) – (F11 on G7x)

1/250sec or faster (for minimizing ambient light)

ISO 80 or 100 (for minimal noise) – G7X: ISO 125

AWB (when shooting RAW it doesn’t really matter – we can make a white balance later in post-production)

BKT OFF

Single Shot (when shooting with strobe(s))

Self Timer OFF

Spot metering (doesn’t do anything when shooting in manual mode, but if you’re shooting in program modes it just measures the light on the spot and not the overall image)

4:3 (shoot at max resolution, you can crop later if needed)

RAW (I’m shooting only raw, if you want JPEG, I recommend setting the camera to RAW & JPG large so you’ll have RAW images for later use)

ND filter This filter will cut your exposure by -3 stops. Use it if the image is still overexposed with minimum strobe power or if you want a black background. It’s very useful when shooting super-macro with a close-up lens like the INON UCL 165, INON UCL 100, SubSee+5, SubSee+10, or Nauticam SMC.

When shooting super-macro with a close-up lens you have to use the zoom to get the best possible result. If you want the maximum magnification, zoom in all the way (make sure to switch the Digital Zoom OFF), then get very close. The distance depends a bit on the lens, but typically I would say between 3-6cm / 1-2inches away from the subject (the subject should get in focus automatically when the continuous AF is set to on), half-press the shutter until you get the green or blue square and shoot.

Practice first on land to avoid wasting valuable time underwater!

Here are some shots I took with a single strobe:

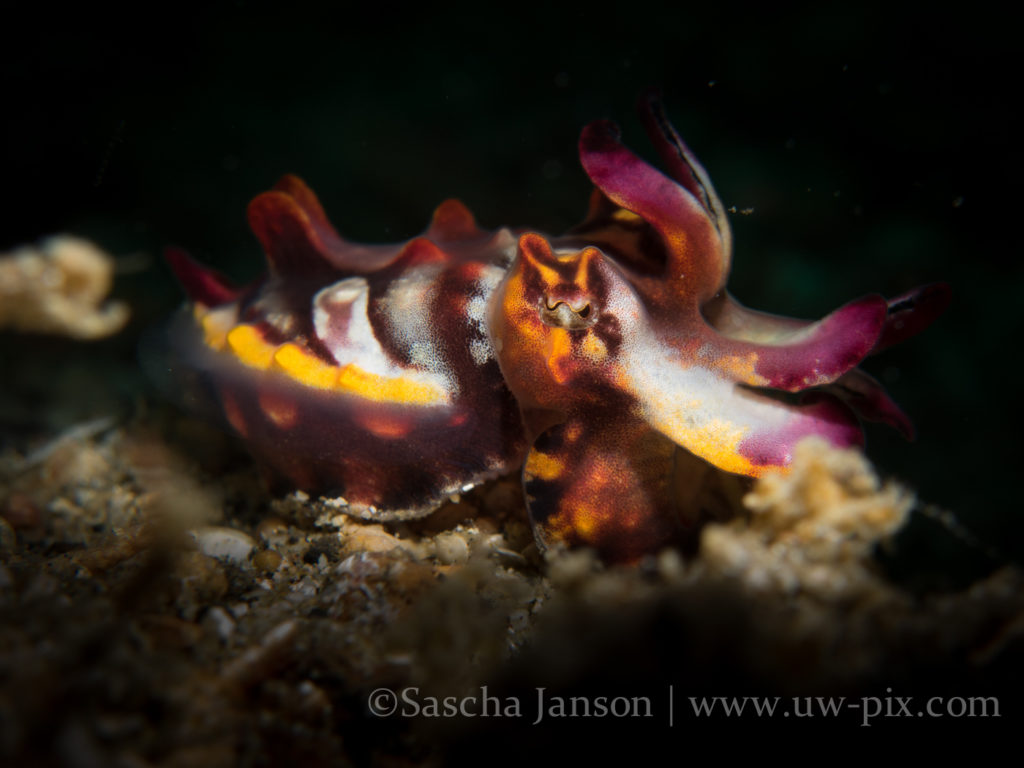
Flamboyant cuttlefish (Metasepia pfefferi) shot with S120 in manual mode (f8, ISO80, 1/400sec, 1x INON UCL165 macro lens, 1xINON D2000)


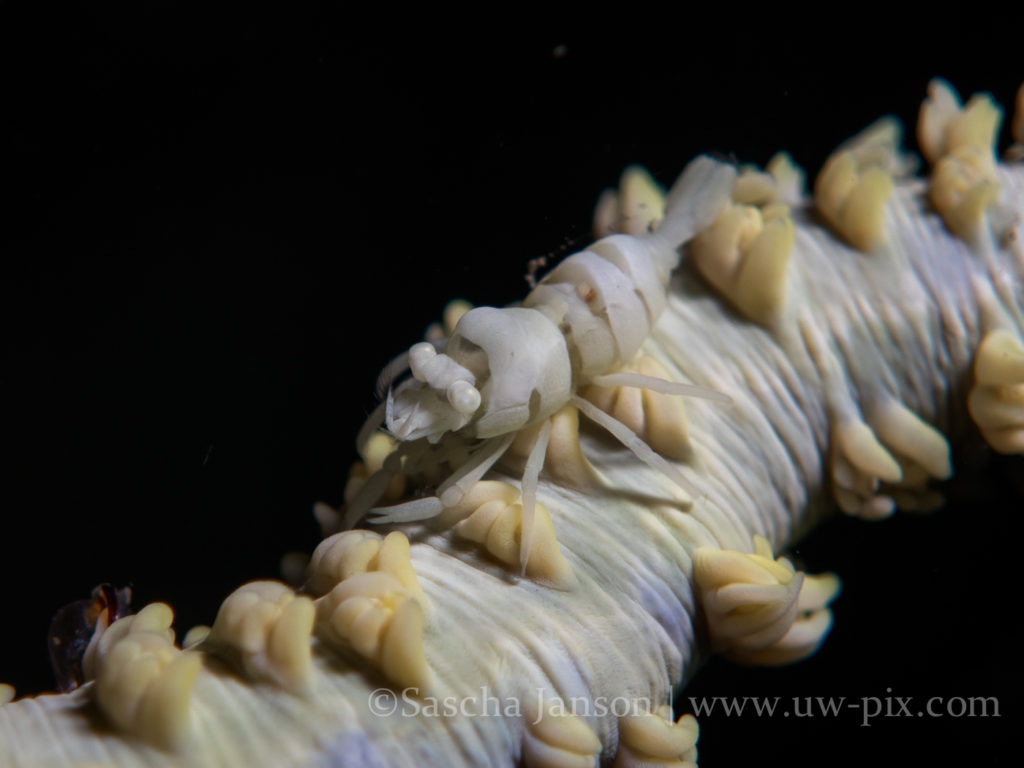
Wire coral shrimp (Pontonides uncigar) shot with S120 in manual mode (f5.7, ISO80, 1/800sec, ND filter ON, 1x INON UCL165 macro lens, 1x INON D2000)


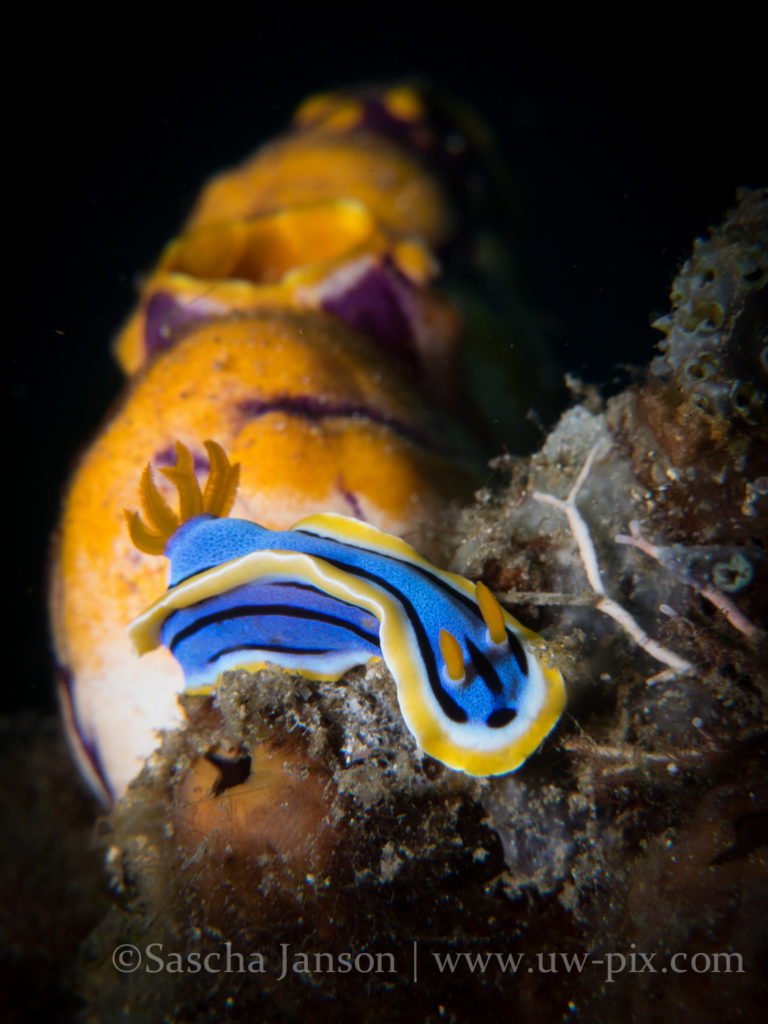
Chromodoris nudibranch (Chromodoris annae) in front of Tunicate shot with S120 in manual mode (f8, ISO80, 1/800sec, ND filter ON, 1x INON UCL 165 macro lens, 1x INON D2000 strobe)


Shooting with LED lights:

If you’re shooting with strong LED lights, you can shoot in Av mode, if you want to be more creative, shoot in manual mode. The good thing about shooting with constant lights is that you can see the light before already, so the light-meters work! Good starting settings for shooting in AV mode are:

F5.6 for getting a relatively good depth of field (If you have powerful enough lights, and you get close, you can even shoot f8!)

ISO 160 or 200 don’t go higher than 320, or you will get a lot of noise

ND filter OFF – you shouldn’t use the ND filter when shooting with LED lights

Exposure compensationExposure compensation should be at -2/3 – that will be a good exposure underwater.

All the other settings should be the same as above

The camera will now change the shutter speed to get the desired amount of light. If the shutter speed is slower then 1/60sec you have to go up with the power of the LED or change the ISO (higher number) or choose a larger aperture (lower F-number).


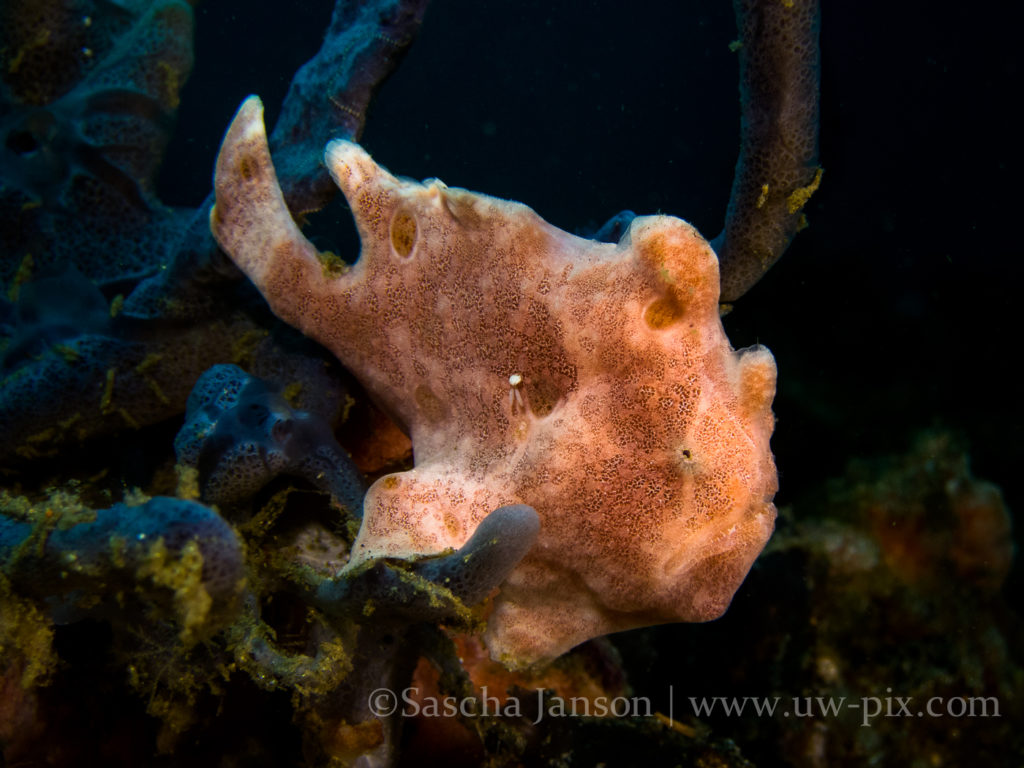
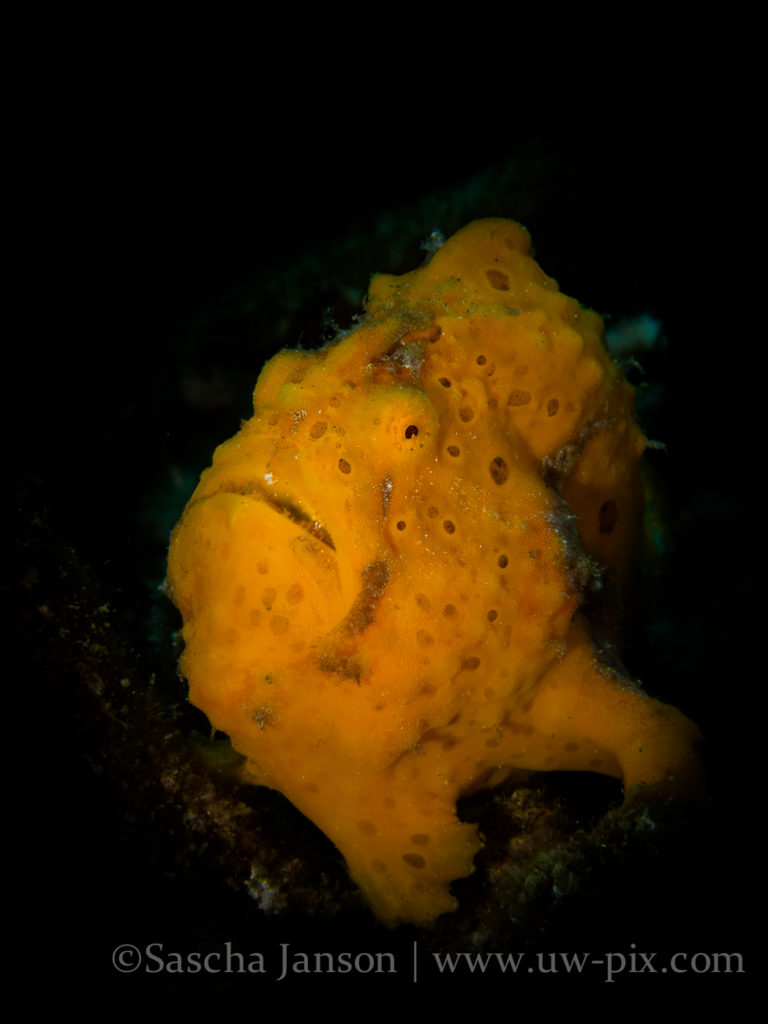
Painted frogfish (Antennarius pictus) shot with S120 in Av mode (f5.6, ISO160, 1/640sec, +/-(Exp.) -2/3,1x SOLA 4000, 1xSOLA 1200video)


Painted frogfish (Antennarius pictus) shot with S120 in Av mode (f5.6, ISO160, 1/1650sec,+/-(Exp.) -2/3, 1x i-Torch Pro6+, 1xF.I.T. 2400WSR on spot)


Hairy frogfish (Antennarius striatus) shot with S120 in Av mode (f5.6, ISO160, 1/1250sec, +/-(Exp.) -2/3, 1x F.I.T. 2400WSR on spot)


Here are some other settings I recommend setting the camera to (You’ll find these in the Menu):

AF Frame – 1-point or Center  Don’t leave this setting on Face AiAF, because most likely the camera will not recognise the critters’ faces :-)

AF Frame size – Small  For shooting tiny subjects it’s easier to focus on the desired area

Digital zoom – OFF  Don’t use the digital zoom, as it’s similar in quality to just cropping in post-production.

AF-Point Zoom – OFF  This is my personal preference, some people like having an enlarged centre focusing area when focused, I prefer to only get the green square. Play around with it and see what you like better!

Servo AF – OFF  I prefer to have the camera only focusing once when I half-press the shutter, so I can rock in and out to get the subject in focus (while keeping the shutter half-pressed). If you switch the servo AF on, the camera keeps focusing while half-pressing the shutter. If this function is set to on, the frame turns blue when in focus, if it’s off, the frame turns green when in focus.

Continuous AF – ON  It can be helpful to keep this function on. It allows the camera to focus continuously without half-pressing the shutter button. It will focus faster when you finally half-press your shutter button to take the image. It also uses more battery, if you want to save battery power, switch it off.

Touch Shutter – OFF (only S110 / S120)  You cannot use the touch screen underwater, so no real use for that.

AF-Assist Beam – OFF  The beam will be blocked by the housing, so not really useful ;-)

MF-Point Zoom – on  It enlarges the center focusing area for easy viewing at all times when shooting in manual focusing mode.

Safety MFON  This refines the manual focusing when the shutter is half-pressed. Switch it OFF if you don’t want that.

Flash Settings  If you are shooting in Manual Mode with an external strobe, set to minimum power to save battery life. Switch OFF the Red-Eye Lamp.

Spot AE Point – AF Point  Calculates exposure using the selected AF point (only works in AUTO-modes, useless in manual mode).

Blink Detection – OFF  The camera most likely will not detect the critters’ eyes, so no use.

i-Contrast – OFF  This function is useless unless you are shooting in Auto ISO mode. However, Auto ISO is not recommended. You will get noise in your images when the camera automatically chooses a higher ISO in darker underwater environments.

IS Mode  The Image Stabilizer might be helpful if you are shooting at slower shutter speeds if you’re shooting a moving object, or when shooting video.

Record RAW + L – ON  This function allows the camera to record simultaneously a RAW file + a large JPEG file. I strongly recommend shooting in raw, read this article if you want to know why.


Shooting TTL (through the lens)

If you want to use the TTL function of your external strobe, set the camera to Av mode (the G7x can do TTL in Manual mode), make sure the flash is on and use the same settings like above (f5.6 – f8 for macro)

The shutter speed will not go slower than 1/60sec if the flash is on.


If you don’t already use Adobe Lightroom, I strongly recommend using it. It will help you get organized with your images and makes displaying raw files easier. It is also a very powerful tool to enhance your images. Adobe Lightroom is available for MAC and PC.

There’s also the option of getting Lightroom and Photoshop as a bundle with the Adobe Creative Cloud Photography plan (Photoshop CC + Lightroom) for $9.99/month, which I find is a pretty good deal, given that you will always have the newest version of Photoshop and Lightroom.

Critters of the Lembeh Strait | Episode 20/2014

It’s an underwater party and all your favorite critters of the Lembeh Strait are there – anemone fish, blue-ringed octopus, ornate ghost pipefish with eggs (yes, children are welcome at this party!), various frogfishes and a graceful free-swimming ribbon eel. Also keep your eyes peeled for a very special, seldom seen little goby, the Priolepis vexilla, whose blue-and-red striped face, dotty body and spiky dorsal fin will surely charm you. Sit back and enjoy!

Critters of the Lembeh Strait | Episode 19/2014

We have been unusually fortunate these past few weeks in Lembeh with many sightings of mating blue rings, a beautiful red weedy rhinopias, and baby flamboyant cuttlefishes hatching, all of which are beautifully captured in this week’s episode. As an extra cute factor bonus, there’s also footage of a baby clown frogfish waving its lure around as a tiny sponge isopod flirts with death! Enjoy the Critters of the Lembeh Strait.