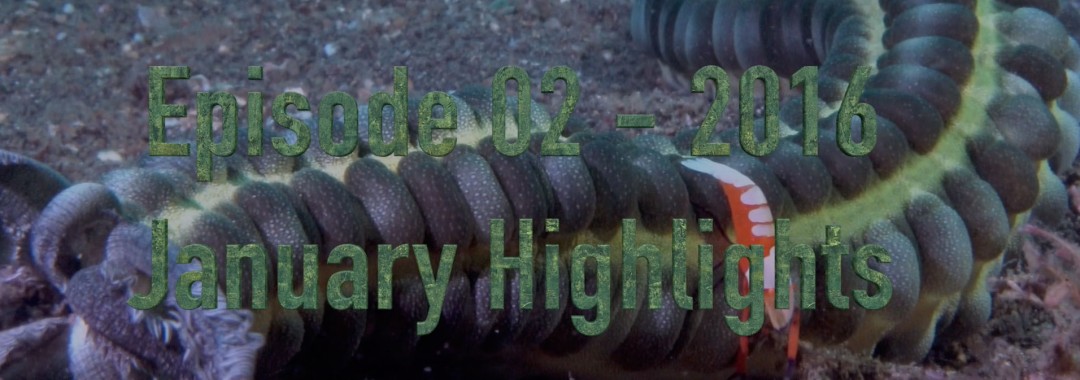
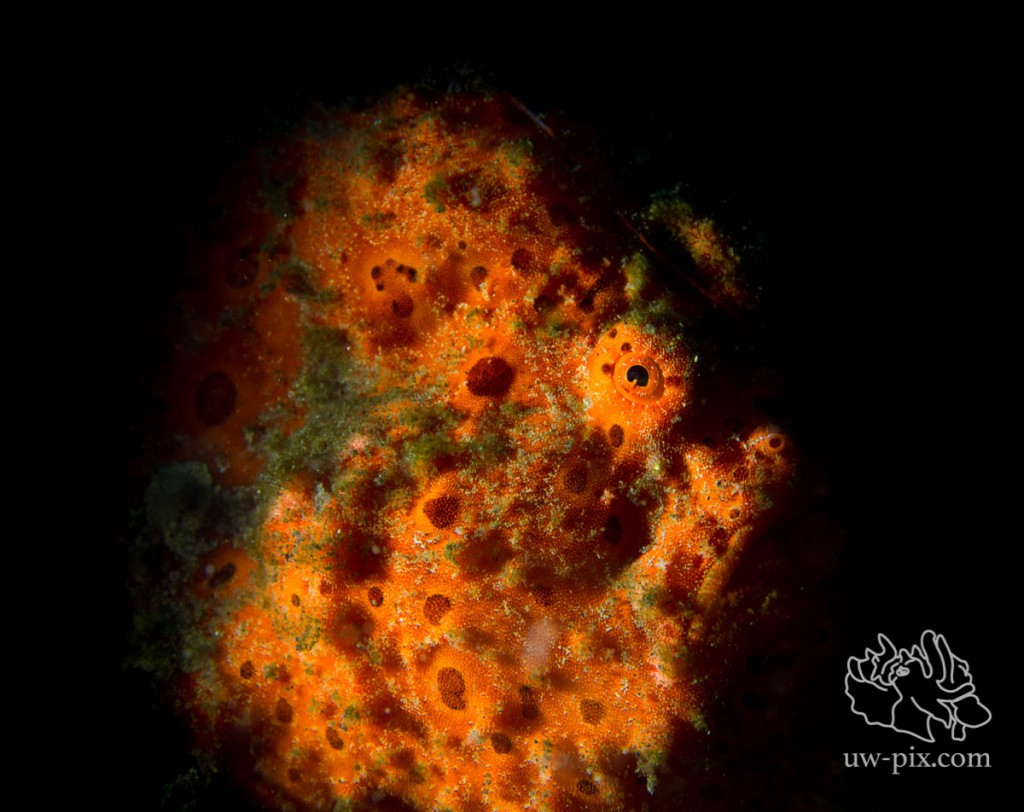
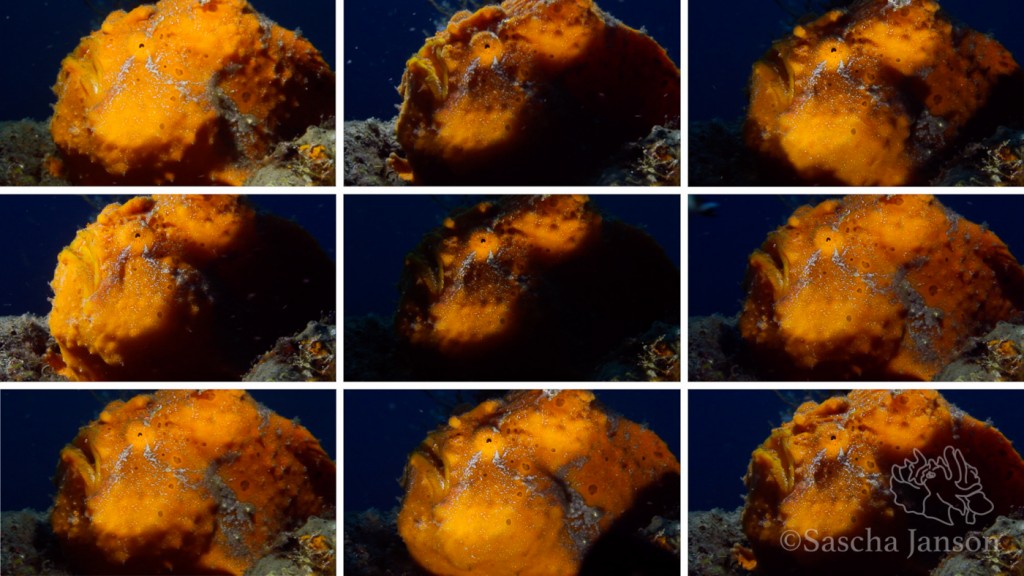
The year startet very good in Lembeh. With lots of frogfish (especially hairy ones), cephalopods (even flamboyant cuttlefish hatching) and many pretty nudibranchs, January was very productive, Here are a few highlights – enjoy!
Author Archive: saschj
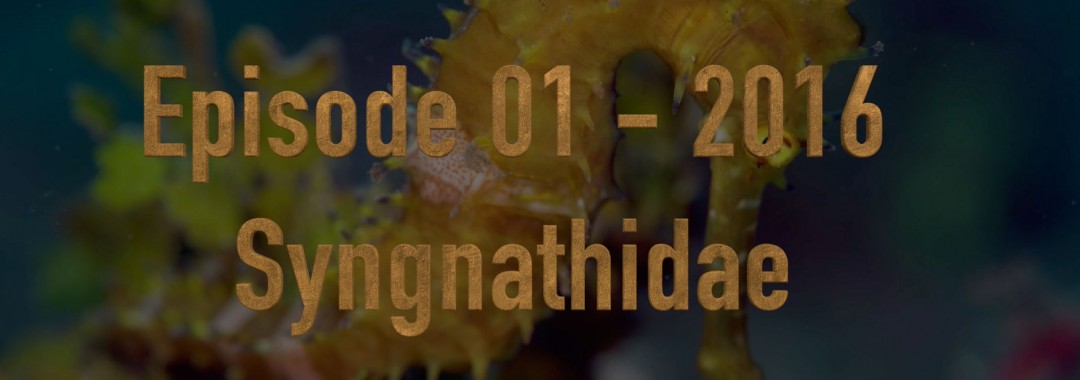
Critters of the Lembeh Strait | Episode 01 – 2016 | Syngnathidae
The first video of 2016 is all about Syngnathidae. The Syngnathidae are a family of fish which includes the seahorses, the pipefishes, the pipehorses, and the seadragons. The name is derived from Greek, syn, meaning “fused” or “together”, and gnathus, meaning “jaws”.
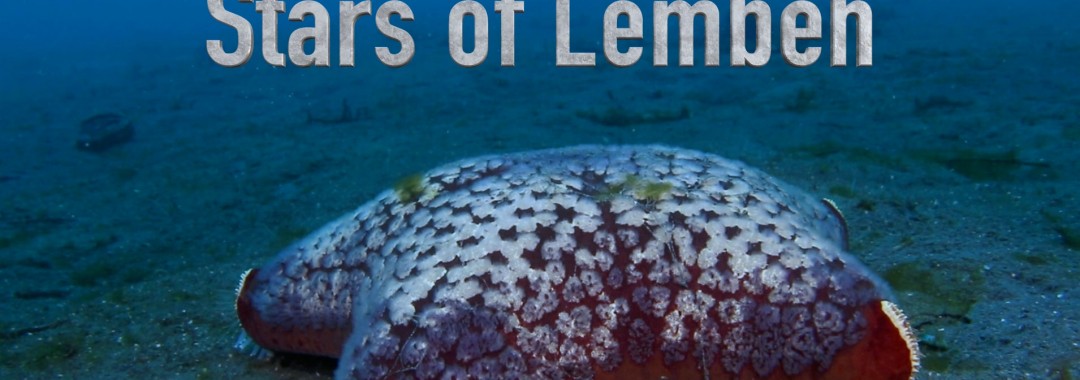
Critters of the Lembeh Strait | Episode 23 – 2015 | Stars of Lembeh
“Stars of Lembeh” is the last video of the year 2015. See for yourself why Lembeh is so special – Which one is your favorite critter-star?

Critters of the Lembeh Strait | Episode 22 – 2015 | Spookiest Critters – Part 2
Are you fascinated by spooky, weird beings? In this video you will see them crawling, writhing, feeding hungrily and lying craftily in wait to ambush prey. Some, like the live headless nudibranch (we named it ‘Ichabod’) will leave you shaking your head in disbelief. Enjoy the show and when you go to bed, don’t forget to leave your night-light on and close the door to your closet, lest these spookiest critters invade your dreams. Enjoy!

Critters of the Lembeh Strait | Episode 21 – 2015 | Spookiest Critters – Part 1
It’s fright night in this episode featuring some very spooky critters of the Lembeh Strait – from the stargazer to bobbit worm, and flamboyant cuttlefish to mantis shrimp – which one do you think is the scariest?
Critters of the Lembeh Strait
Here some critter highlights from diving in the Lembeh Strait…enjoy!
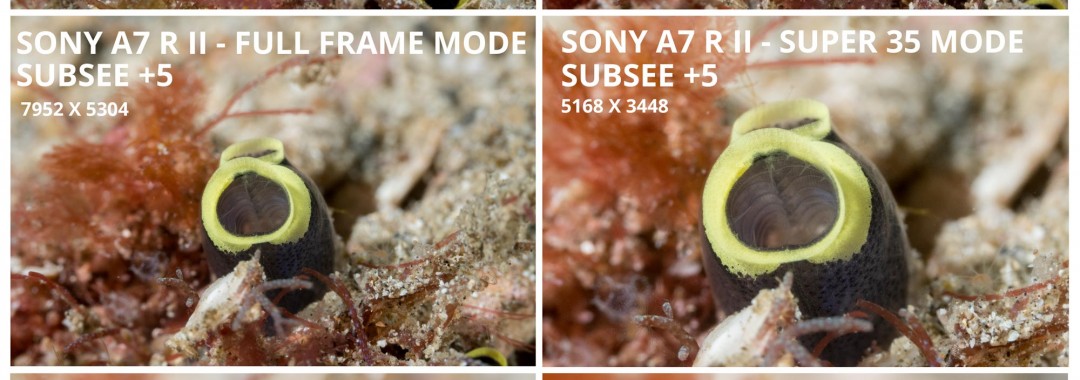
SONY A7RII with SONY FE 90mm F2.8 Macro G OSS & Reefnet SubSee +5 or Nauticam SMC
SONY A7RII with a 90mm macro lens – Image size comparison with the SubSee +5 and the Nauticam SMC
I was checking out different options of so called “wet-lenses” on the SONY A7RII in a Nauticam NA-A7II housing. I used the SONY FE 90mm F2.8 Macro G OSS lens without a wet-lens, with SubSee +5 and with the Nauticam SMC and compared the subject sizes at maximum magnification.
When using no “wet-lens” in Super 35mode, the image size is very similar to when using a SubSee+5 in Full Frame mode & when using a SubSee+5 in Super 35 mode the image size is very similar to when using a SMC in Full Frame mode.
The difference is that you have 42MP in Full Frame mode vs 18MP in Super 35 mode. Of course when shooting stills we want to have the full 42 MP (why else would we pay for them), but the Super 35 mode becomes really handy when shooting video. In both modes the A7RII is recording 4K in camera. It’s like having an extra teleconverter with you while diving. When I’m shooting video I try to use the Super 35 mode whenever possible, but when the subjects are a bit larger, it’s very nice to be able to shoot in full frame mode and get a tick closer.
Here are some images with my results:
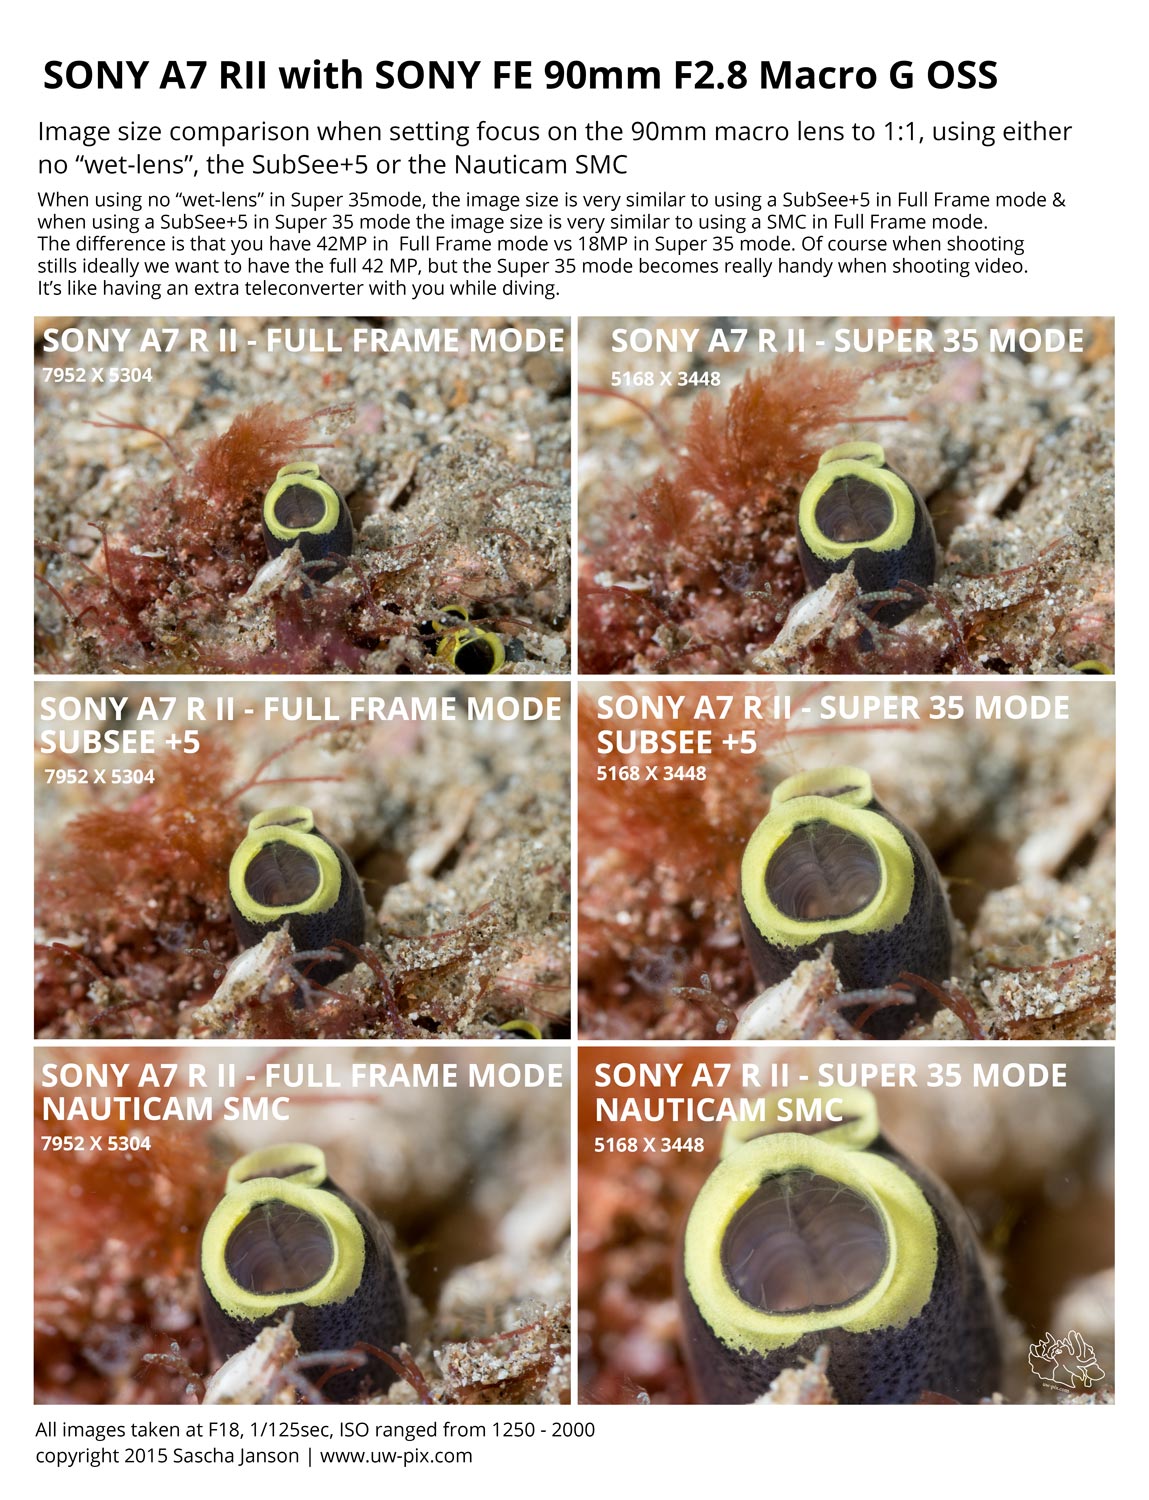
All images taken at F18, 1/125sec, ISO ranged from 1250 – 2000 (I had the camera on AUTO ISO)
Final conclusion: For shooting video with the A7R2 there’s no need for the SubSee +5, but it can be useful when shooting stills. I will do some more testing and keep you posted.
Tips For Underwater Photographers – Fluorescent Photography
UV or fluorescence dives are becoming more and more popular and many dive resorts offer them as part of the experience.
Doing fluorescence dives can be very different than normal dives, and the fluorescence is best appreciated on night-dives.
How to shoot fluorescence underwater?
There are different ways to do fluorescent photography; one way is to use a UV or fluorescent focus/video light to look for subjects, fluorescence filters on our strobes, a yellow filter on our camera and a yellow filter on our mask and the other way is to just use UV lights and a yellow filter on the camera (and mask) and no additional strobes. Because of all these filters the light is not that strong in the first place and we need to use different settings on our cameras. High ISO numbers, large apertures (low f-numbers) and slow shutter speeds are typically needed to be able to see something in our images.
Shooting with strobes
Strobes with fluorescence filters strapped on are stronger than UV lights, allowing us to choose lower ISO numbers, faster shutter speeds and smaller apertures, but we still cannot shoot with our typical macro settings…I usually start off with something like ISO 800-1600 , f8, 1/60sec, take a test-shot and then adjust accordingly…sometimes we need to boost the ISO up more to get the desired depth of field, but that can introduce noise (newer cameras can handle very high ISO numbers without having too much noise)
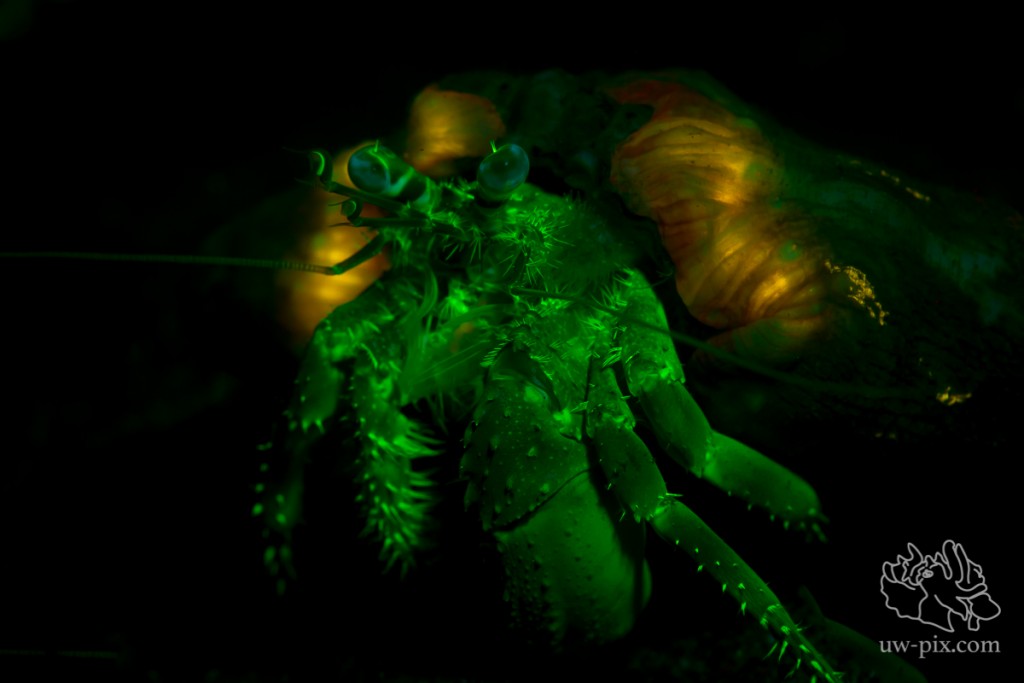
Hermit crab – Canon 7D, 60mm macro, ISO800, f7.1, 1/60sec, 1x i-Torch Pro6 as focus light, 1x INON Z240 with fluorescence filter strapped over the strobe
Shooting with video lights:
Many video and focus lights nowadays have the UV function built in. If you don’t want to invest in the fluorescence filters for the strobes it is possible to use only the UV lights to get some good shots as long as the subjects are small. A good starting setting there is around ISO800-1600, f5, 1/30sec and then adjust according to the subject…for moving subjects use a faster shutter speed.

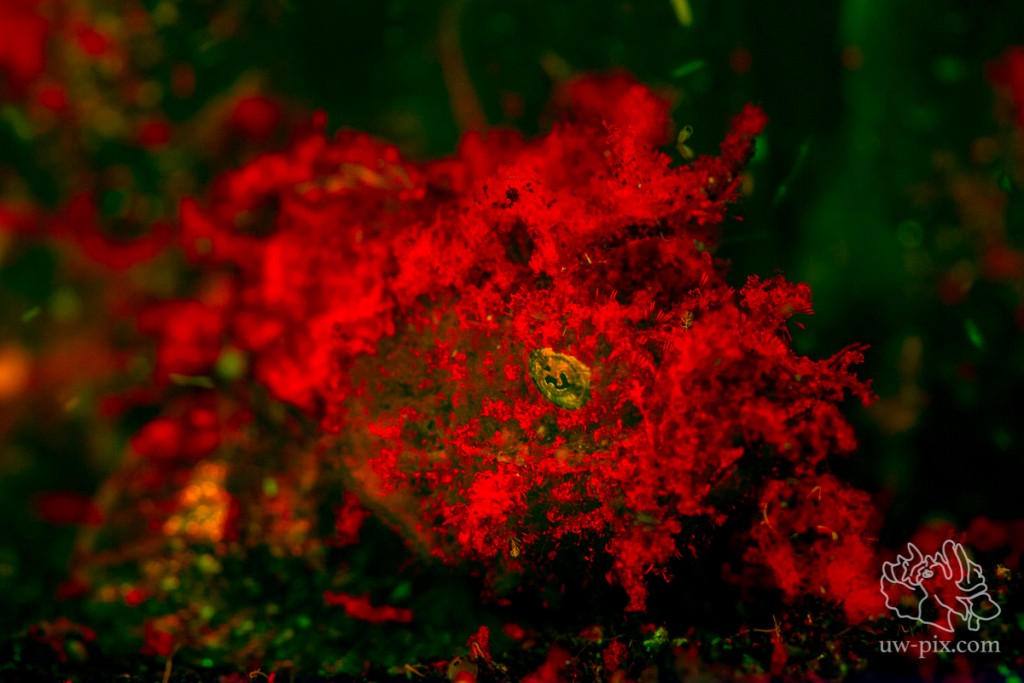
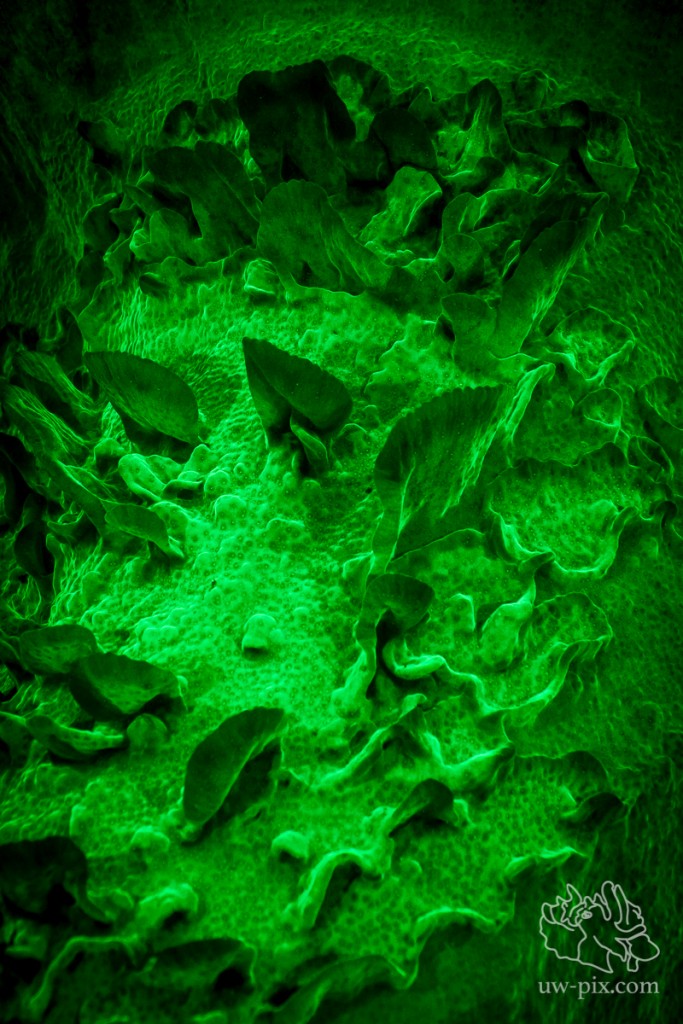
Mushroom coral – Canon 7D, 60mm macro, ISO800, f4.5, 1/30sec, 1x i-Torch Pro6+, 1xi-Torch Pro 7 with fluorescence filter strapped over the light
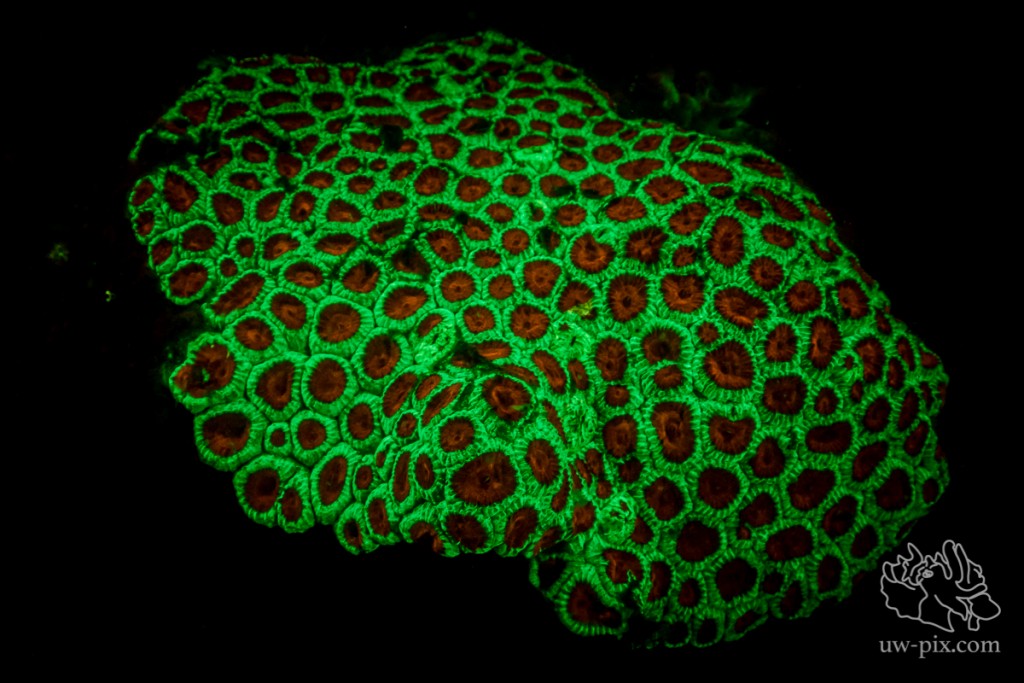
Galaxea coral – Canon 7D, 60mm macro, ISO800, 1/30sec, f4, 1xi-Torch Pro6
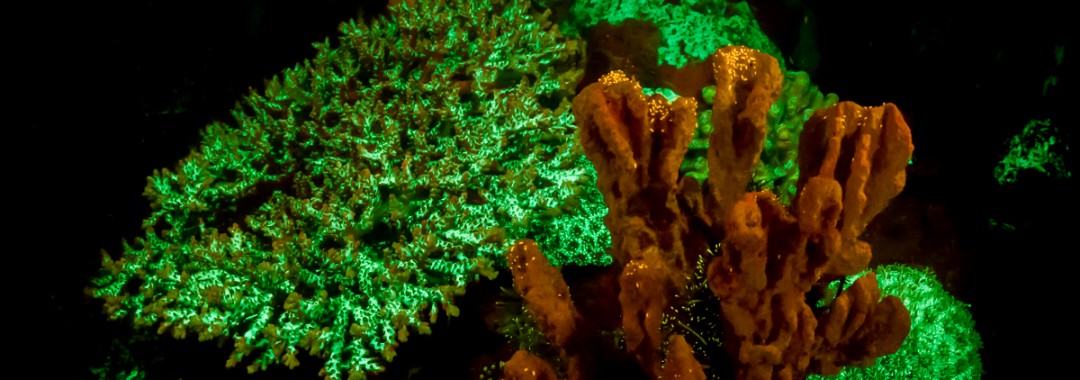
It is easiest to photograph corals and anemones as they don’t move much, but a lot of the critters here in Lembeh are fluorescent as well…
Stargazer (Uranoscopus sp) – Canon 7D Mark II, Tokina 10-17, Kenko 1.4 TC, @17mm, ISO640, f7,1, 1/60sec, 2xi-Torch Venom 50
Wrasse – Canon 7D Mark II, 60mm macro, ISO640, f5.6, 1/125sec, 2x i-Torch Venom 50
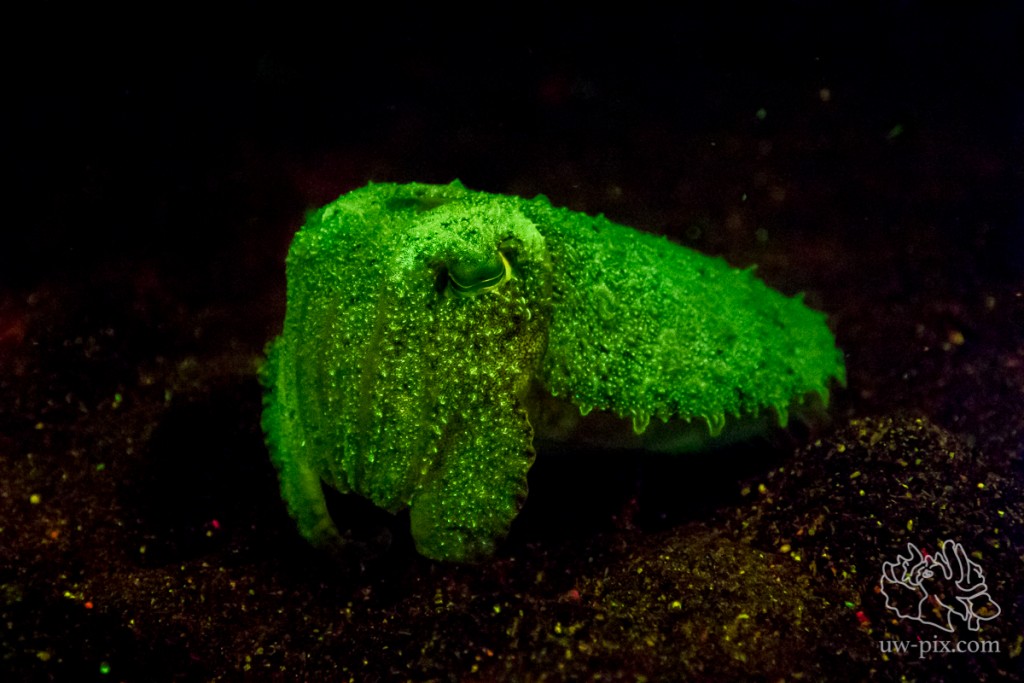
Needle cuttlefish (Sepia aculeata) – Canon 7D Mark II, Tokina 10–17mm, Kenko 1.4x TC, ISO 16000, f/6.3, 1/30s, 2x i-Torch Venom 38
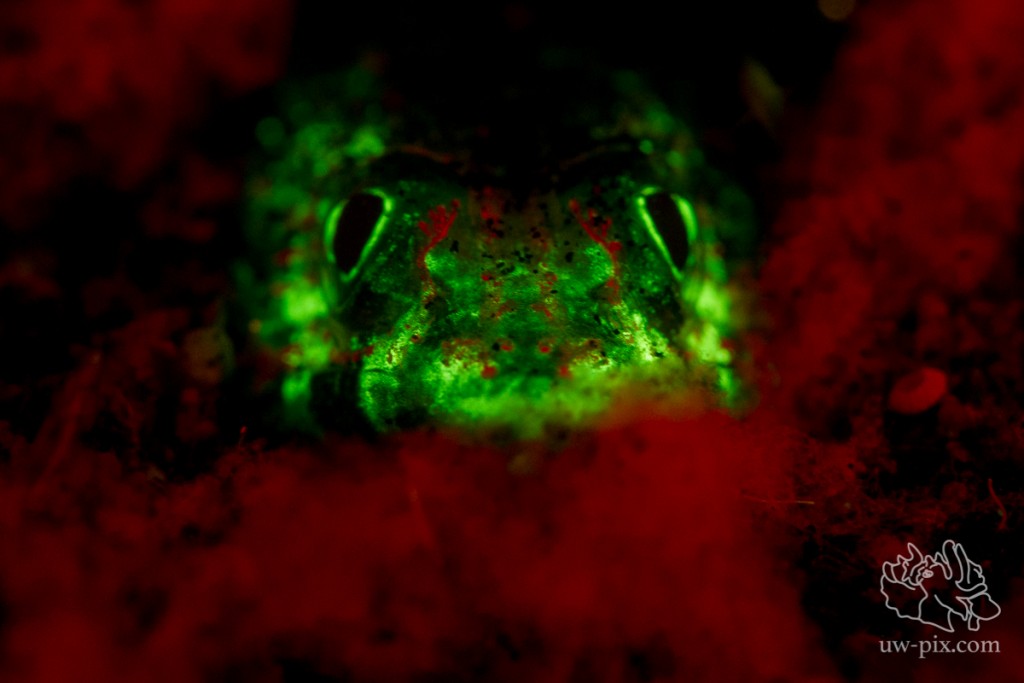
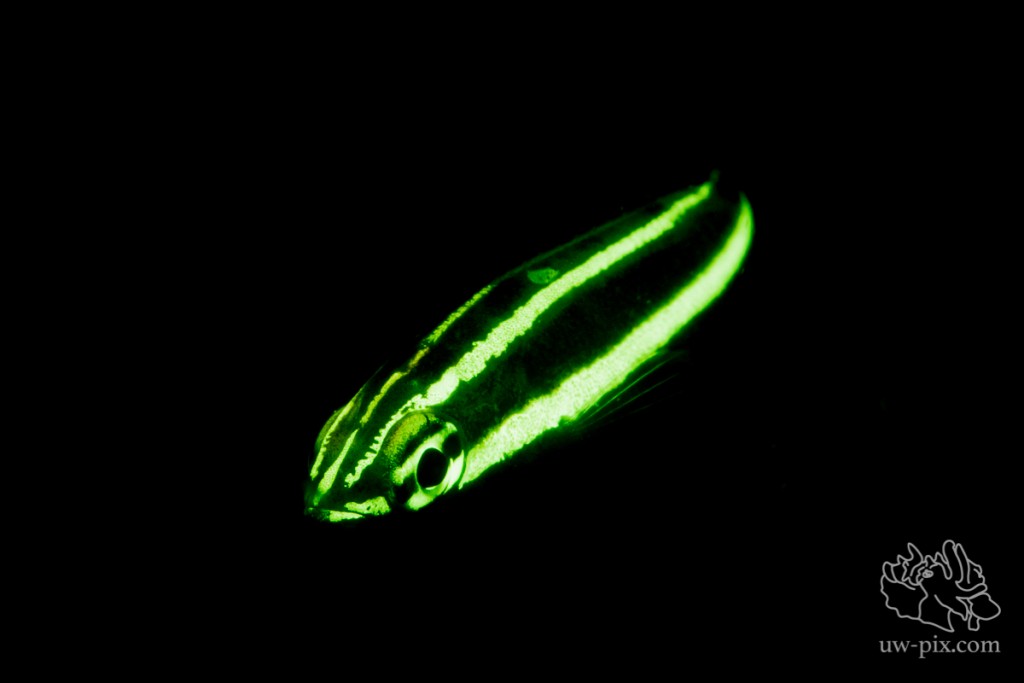
Lizardfish – Canon 7D, 60mm, ISO640, 1/30sec, f5, 1x i-Torch Pro6
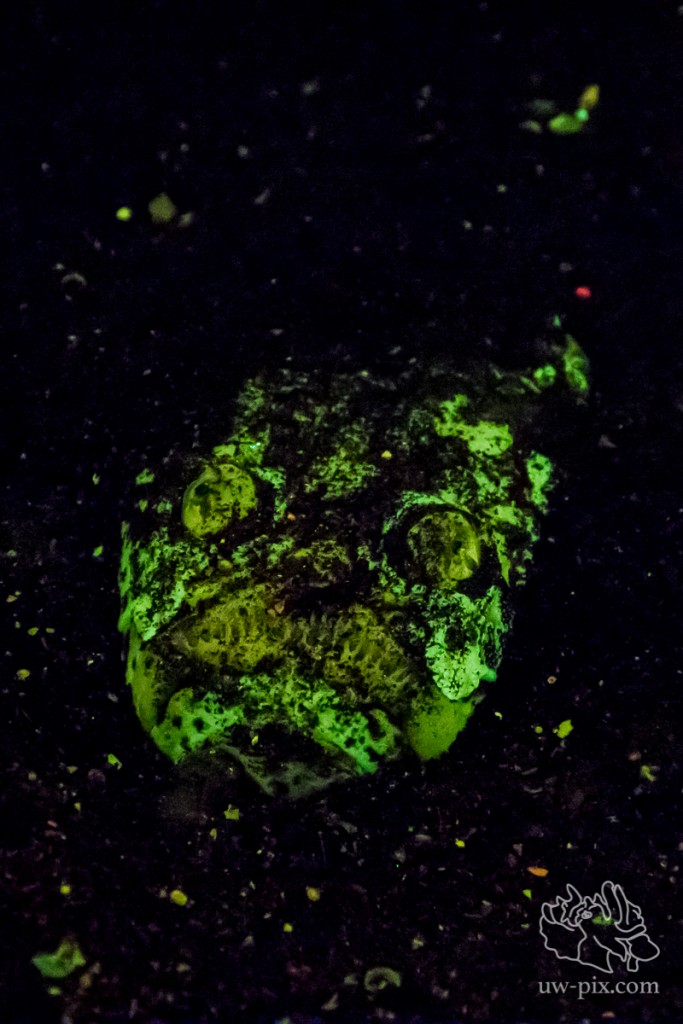
This is a little scorpionfish with some algae growth on him…the scorpionfish itself is not fluorescent, it’s the algae! – Canon 7D, 60mm, ISO640, 1/30sec, f3.5, 1x i-Torch Pro6+, 1xi-Torch Pro 7 with fluorescence filter strapped over the light
With multiple UV lights and a wider lens (i.e. fisheye lens) it is possible to illuminate larger subjects:
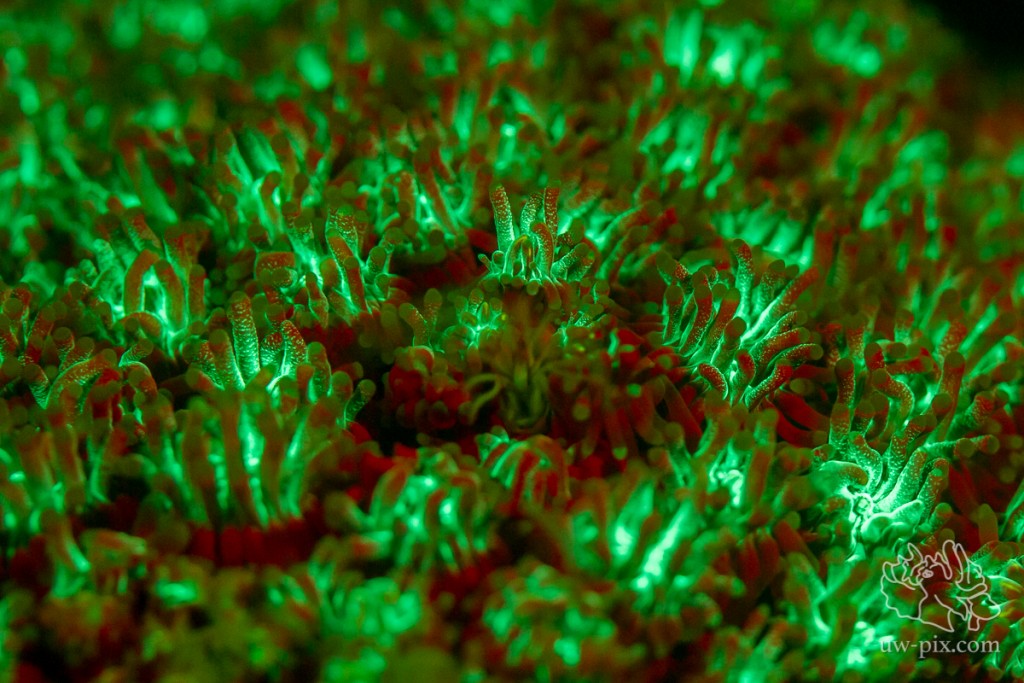
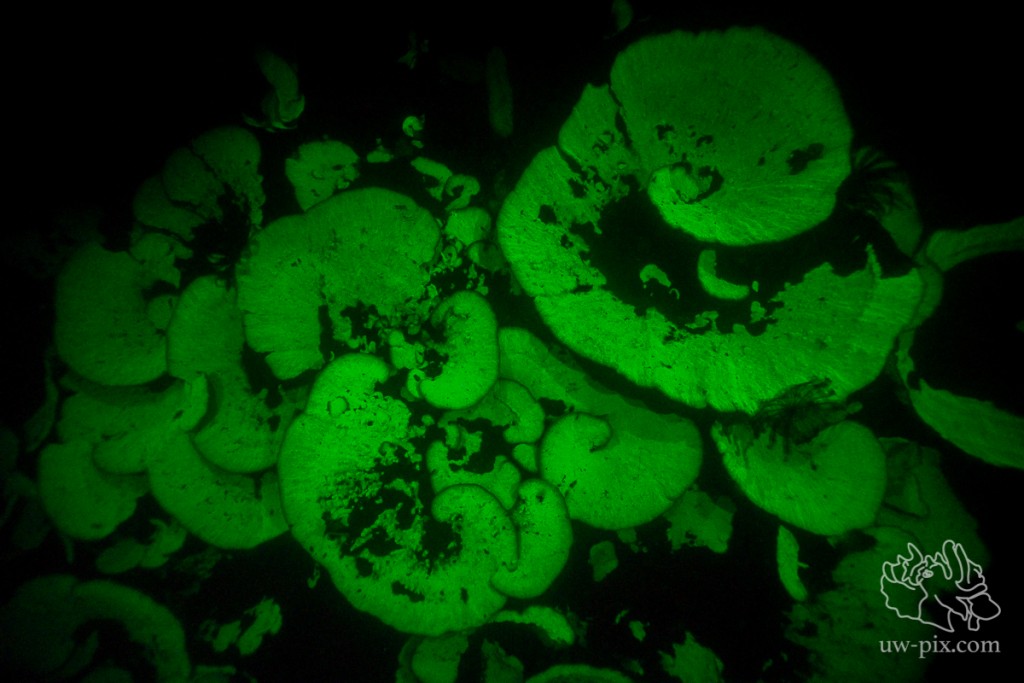
Favia coral – Canon 7D Mark II, Tokina 10-17, Kenko 1.4 TC, @17mm, ISO640, f7,1, 1/60sec, 2xi-Torch Venom 50, 2xi-Torch Venom 38, 1x i-Torch Pro6+

Reef-scene in UV view – Canon 7D Mark II, Tokina 10–17mm, Kenko 1.4x TC, @14mm, ISO 5000, f/5, 1/60s, 2xi-Torch Venom 50, 2xi-Torch Venom 38, 1x i-Torch Pro6+
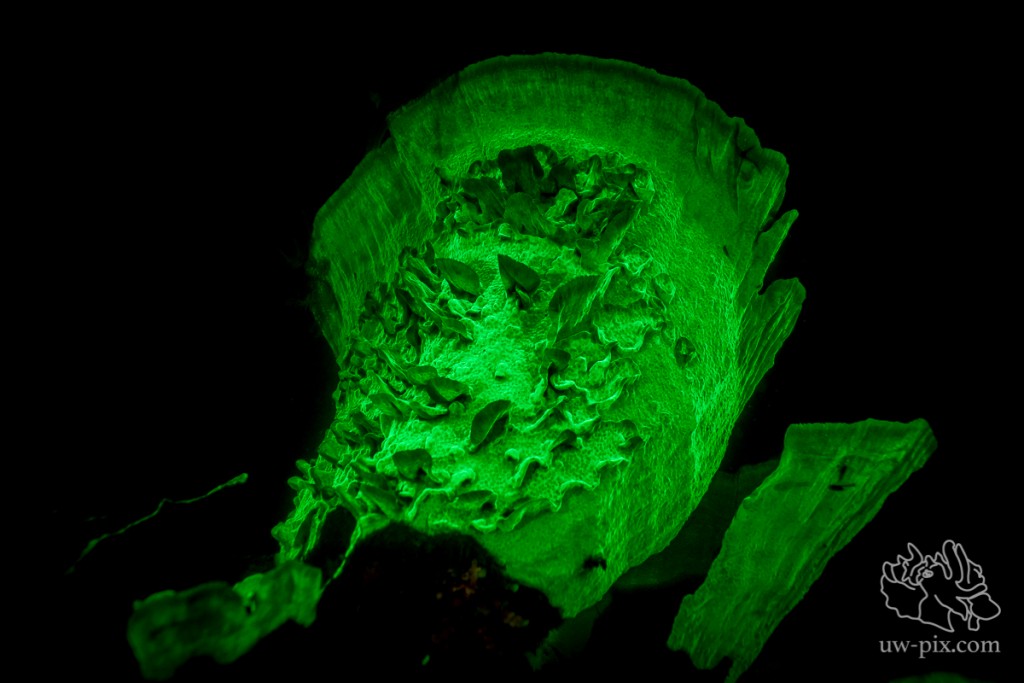
Hard coral (Montipora tuberculosa) – SONY A7 RII, SONY FE 16-35mm f4 ZA OSS @16mm, ISO2000, f4, 1/60sec, 1xi-Torch Venom 50, 2x i-Torch Venom 38, 1x i-Torch Pro6+
Close-up of above image
Hard coral (Montipora tuberculosa) – helicopter-shot – SONY A7 RII, SONY FE 16-35mm f4 ZA OSS @16mm, ISO20.000, f4, 1/60sec, 1xi-Torch Venom 50, 2x i-Torch Venom 38, 1x i-Torch Pro6+
Scientists still don’t fully understand what purpose(s) fluorescence serves in marine life but theories propose that it may be for communication, as protection and to fool predators. Whatever the reason, it’s fascinating to discover and photograph a whole new side to fish, creatures, corals and anemones whose appearance changes radically under fluorescent light. See if you can discover fluorescence in an organism you never knew had it in them! Remember as always to be respectful of marine life and be cautious if you are using fluorescent lights on an animal, as some may have eyes which are particularly sensitive to that spectrum of light. Also keep in mind that if you are diving with UV lights, non-fluorescent coral is harder to see, so go slow and take care not to damage unseen organisms or habitat.
How to Photograph ‘Frogfish’
This Week’s Tip: How to Photograph ‘Frogfish’
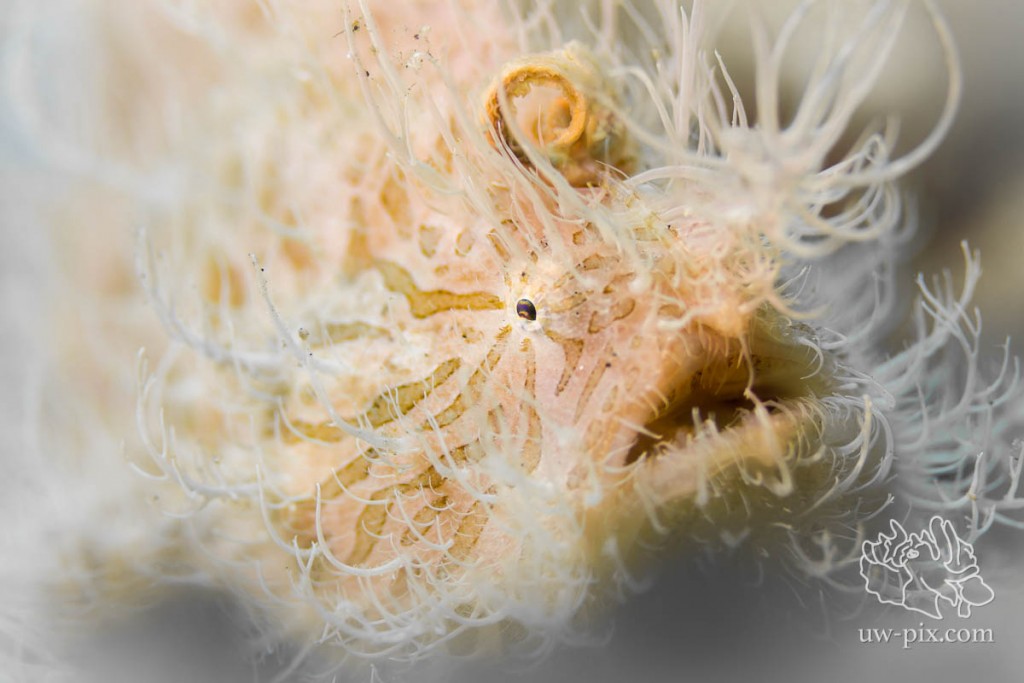
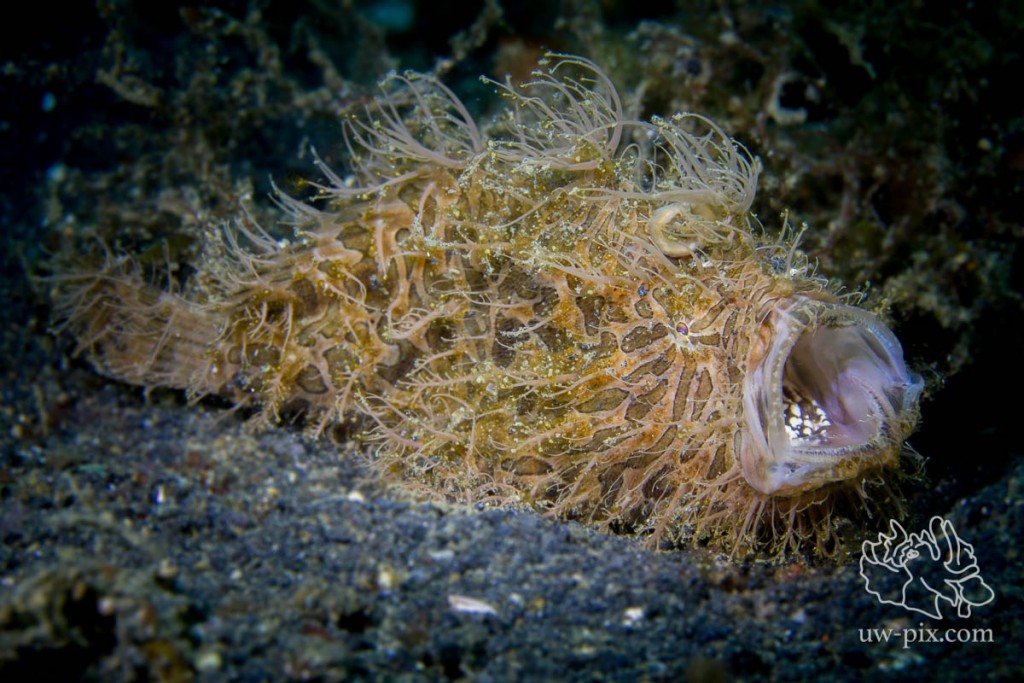
Frogfish or Anglerfish are a favorite subject of many photographers, because like nudibranchs they usually don’t move much, although hairy frogfishes tend to be more active than other species. They’re also not shy, so they can be shot from very close distance.
The best lenses to use are macro lenses such as 60mm, 100mm, or 105mm for DSLR’s, (nowadays with different cameras like mirrorless & micro 4/3 etc. the lenses vary a lot, I use a 90mm at the moment on a SONY A7R2). For shooting super-macro images of tiny juveniles, eyes or the lures, use close-up diopters or teleconverters.
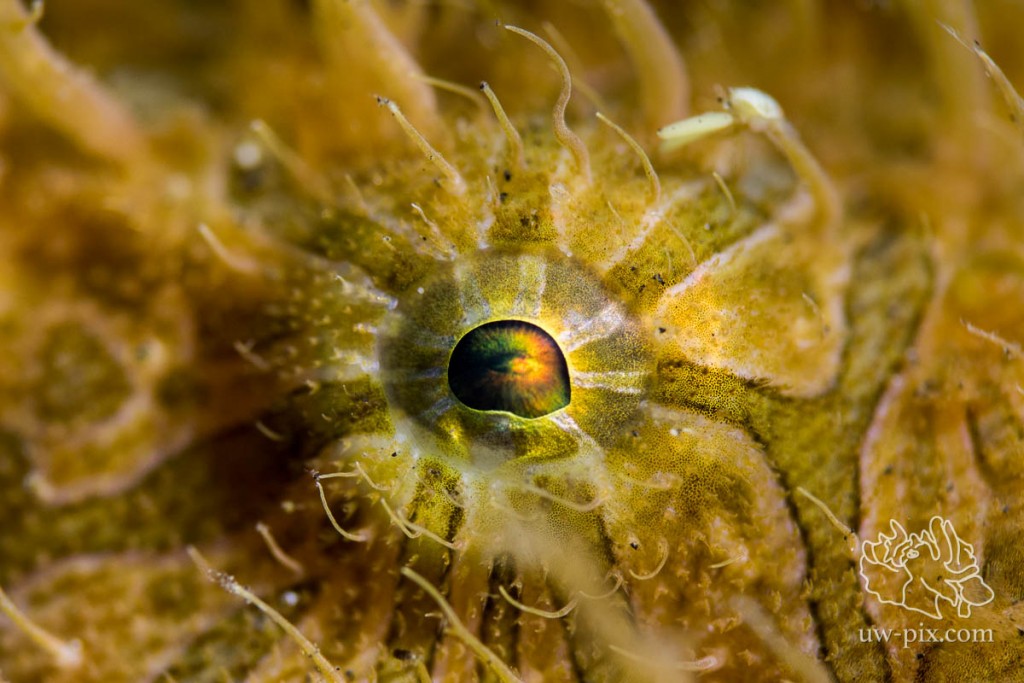
Hairy frogfish (Antennarius striatus) eye – Canon 7D Mark II, 60mm, Nauticam SMC, f5.6, 1/160sec, ISO 160, 1x SOLA 4000, 1x SOLA 2100
For shooting CFWA (close-focus-wide-angle) of giant frogfish, fisheye lenses are the preferred choice, for smaller subjects we can combine the fisheye lens with a teleconverter. Try to get as low as possible and shoot slightly upwards to isolate the fish clearly against the blue water background.
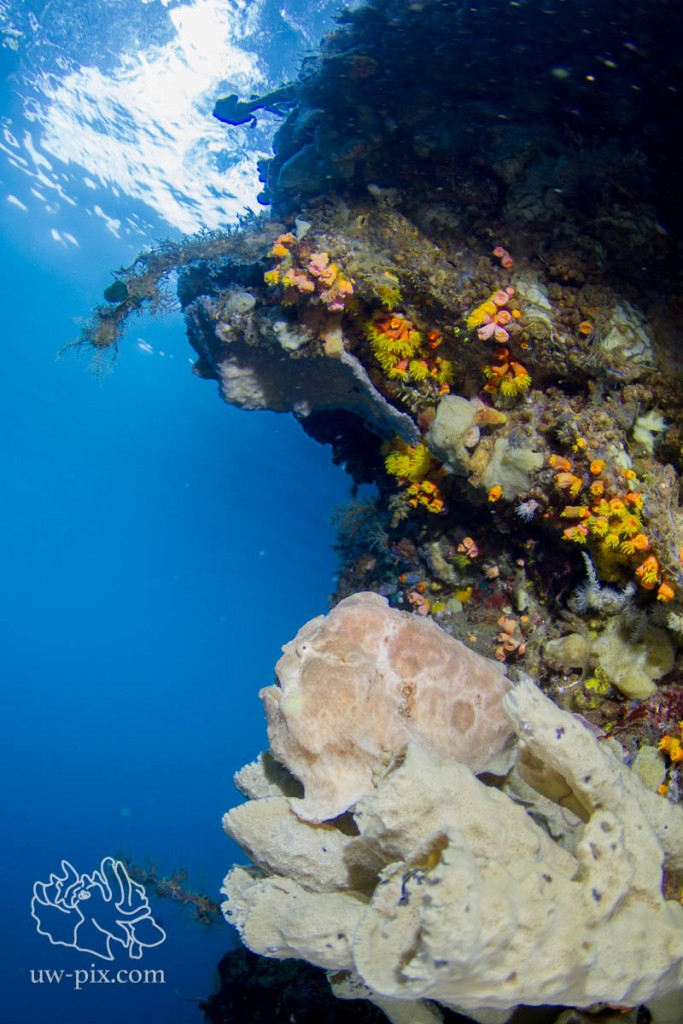
Giant frogfish (Antennarius commerson) sitting on a sponge at the mini-wall @ Nudifalls – shot upwards into the water column to get a blue background – Canon 7D, Tokina 10-17 @ 10mm, f3.5, 1/80sec, ISO200, 2xL&M SunRay 2000 LED lights
The same giant frogfish (Antennarius commerson) on the same sponge, this time shot downwards in the water column to get a black background – Canon 7D, Tokina 10-17 @ 10mm, f3.5, 1/250sec, ISO200, 2xL&M SunRay 2000 LED lights
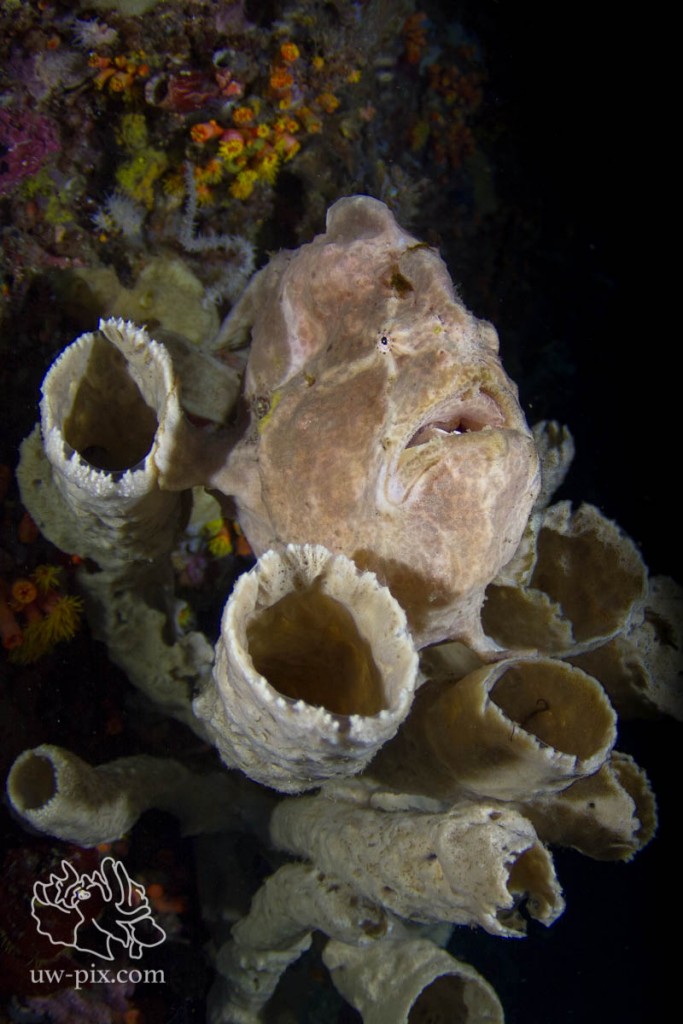
To show how well they camouflage, it sometimes can be nice to back off a bit and not fill the frame with the frogfish.

Giant frogfish (Antennarius commerson) on a sponge – Canon 7D Mark II, Tokina 10-17, Kenko 1.4 TC @14mm, f8, 1/125sec, ISO640, 2xSOLA 4000
Getting really close is key when shooting CFWA, using a mini dome is recommended. Black hairy frogfish (Antennarius striatus) very close to the port – Canon 7D Mark II, Tokina 10-17, Kenko 1.4 TC @14mm, f10, 1/50sec, ISO320, 2x i-Torch Venom 50, 2x i-Torch Venom C92
When frogfish are ‘luring’, try to shoot them from the side, to get the lure and the frogfish in focus
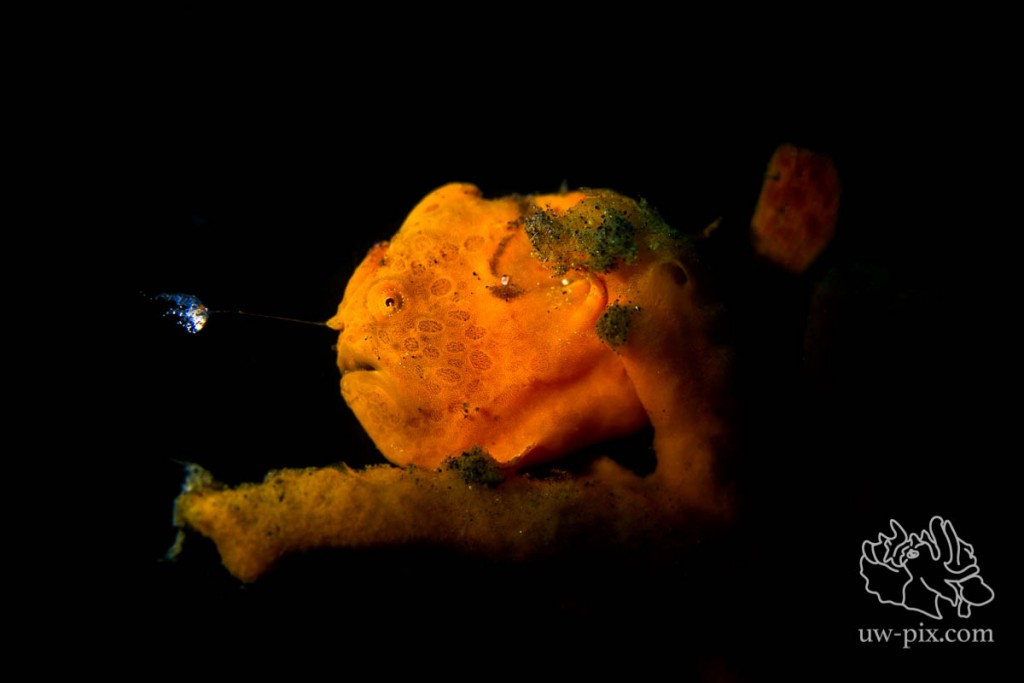
Painted frogfish (Antennarius pictus) fishing with its lure – Canon 7D, 60mmm macro, f5.6, 1/320sec, ISO160, 1xSOLA 1200 on spot
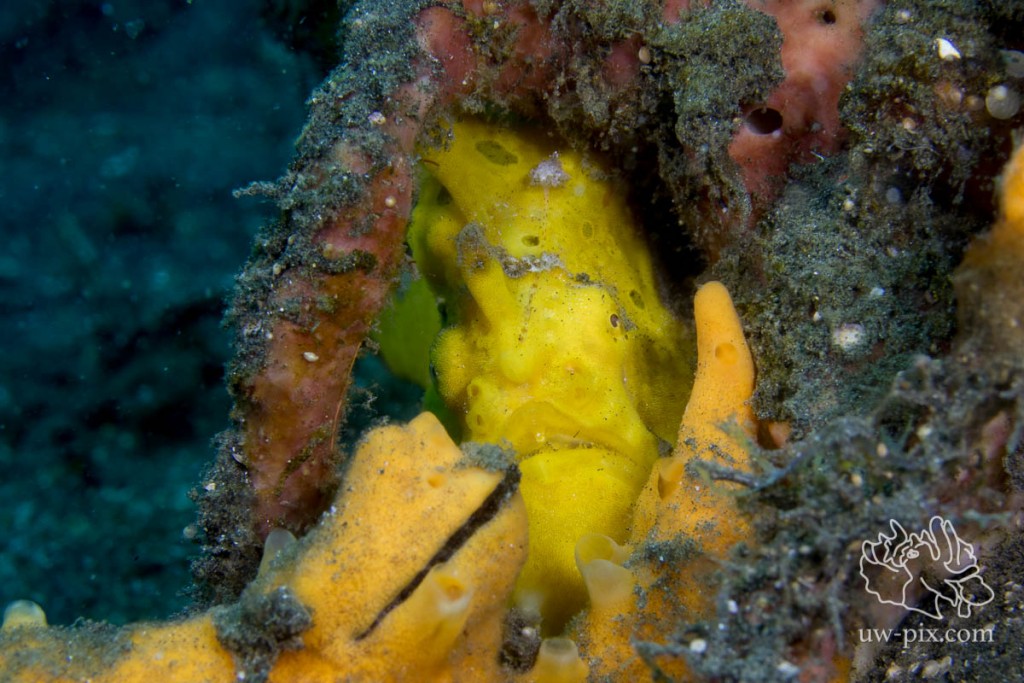
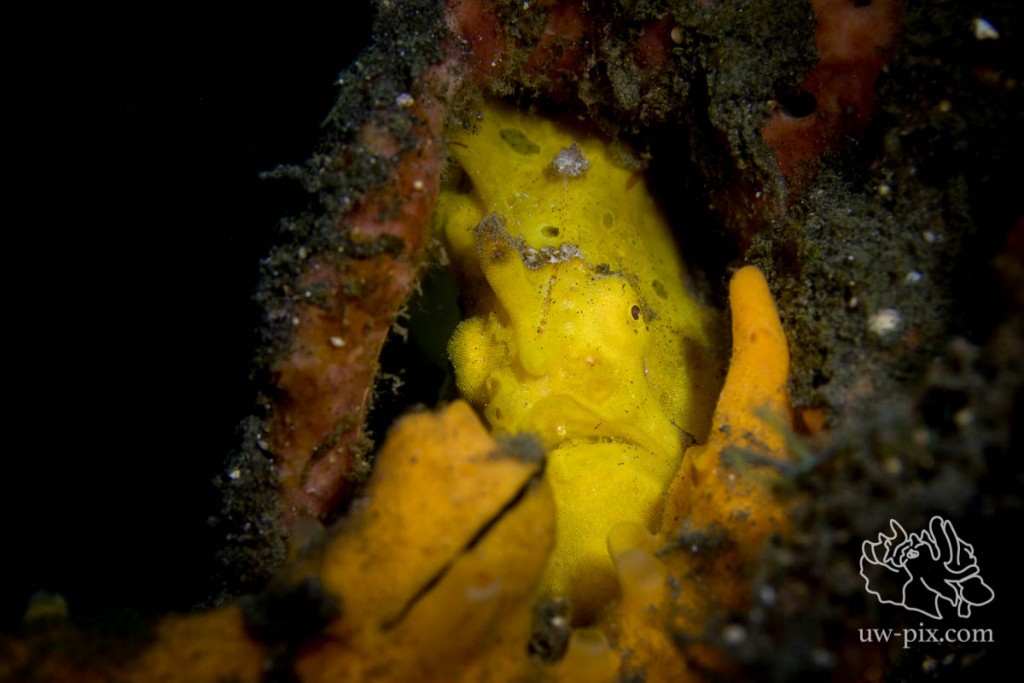
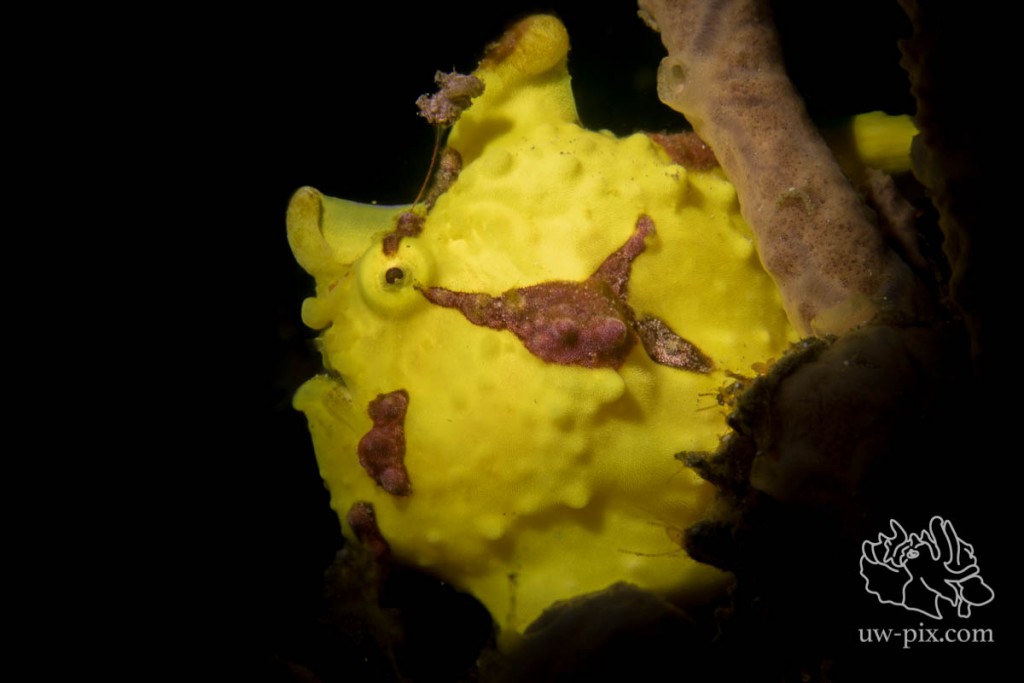
Frogfish also look cool when shooting portraits, it can be nice to fill the frame with the face only (especially when you run into a larger frogfish with a 100/105 (or 90mm 😉 ).
Use a large aperture (low f-number) to get out of focus backgrounds and foregrounds.
Hairy Frogfish (Antennarius striatus) close-up portrait shot with a large aperture – Canon 7D, 100mm macro, f3.5, 1/800sec, ISO160, 2x L&M SunRay2000 LED lights. This frogfish was just too big for my lens (100mm), so I decided to go for a portrait.
Why can using only one light-source be helpful?
Warty frogfish (Antennarius maculatus) sitting in sponges, 2 lights lighting up the subject, but also the distracting background – Canon 7D Mark II, 60mm macro, f13, 1/60sec, ISO160, 1xSOLA4000, 1xSOLA2100
Using only one light-source will create dramatic shadows and can give us a darker background if we don’t light up all that sand.
The exact same subject (and exact same camera position), but this time I used only one LED light on spot – Canon 7D Mark II, 60mm macro, f5.6, 1/1000sec, ISO160, 1xSOLA2100 (on spot) – to get a similar result with a strobe, use a snoot.
Warty frogfish (Antennarius maculatus) shot with one LED light on spot – Canon 7D Mark II, 60mm macro, f16, 1/60sec, ISO100, 1x Sea Dragon 2100 on spot
When using a snoot or spot on a LED light, black backgrounds and dramatic shadows are possible – Canon 7D, 60mm macro, f11, 1/125sec, ISO160, 1x SOLA1200 on spot
Always remember that with moving your strobe/light around you’ll get different results as I mentioned here:
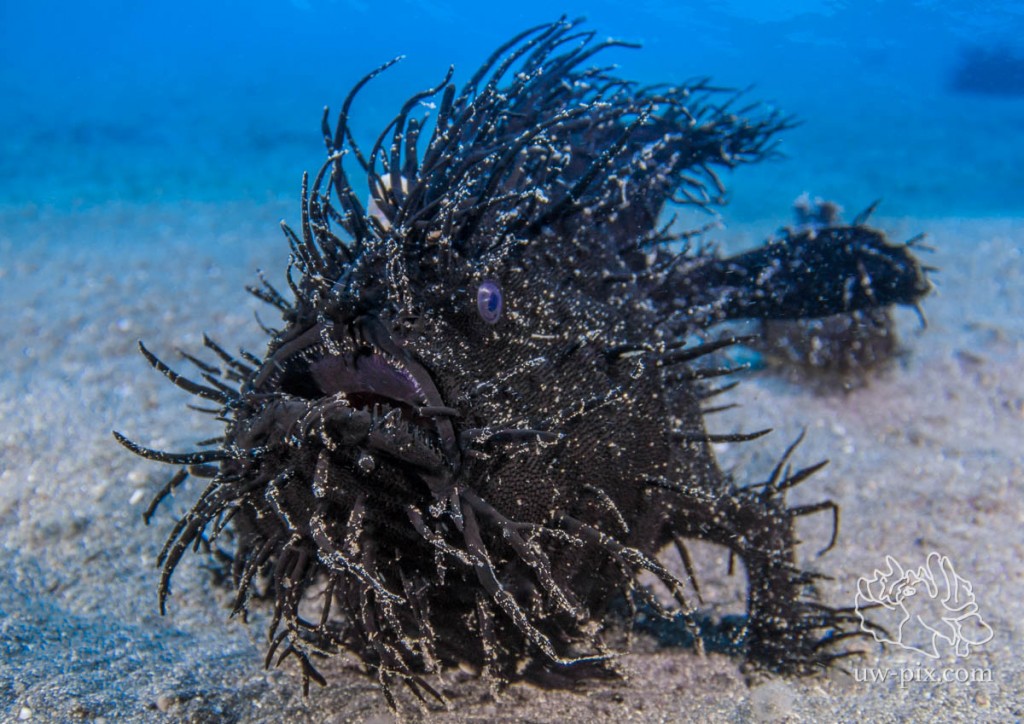
For hairy frogfish, backlighting with a LED light or a strobe will make the hairs stand out more. Use one strobe from behind and one from the front to light up the face as well.
Hairy frogfish (Antennarius striatus) backlit to make the hair stand out more – Canon 7D Mark II, 60mm macro, f11, 1/200sec, ISO160, 2x SOLA 4000 (1xfront, 1xback), 1x SOLA2100(front), 1x F.I.T.2400WSR (back)
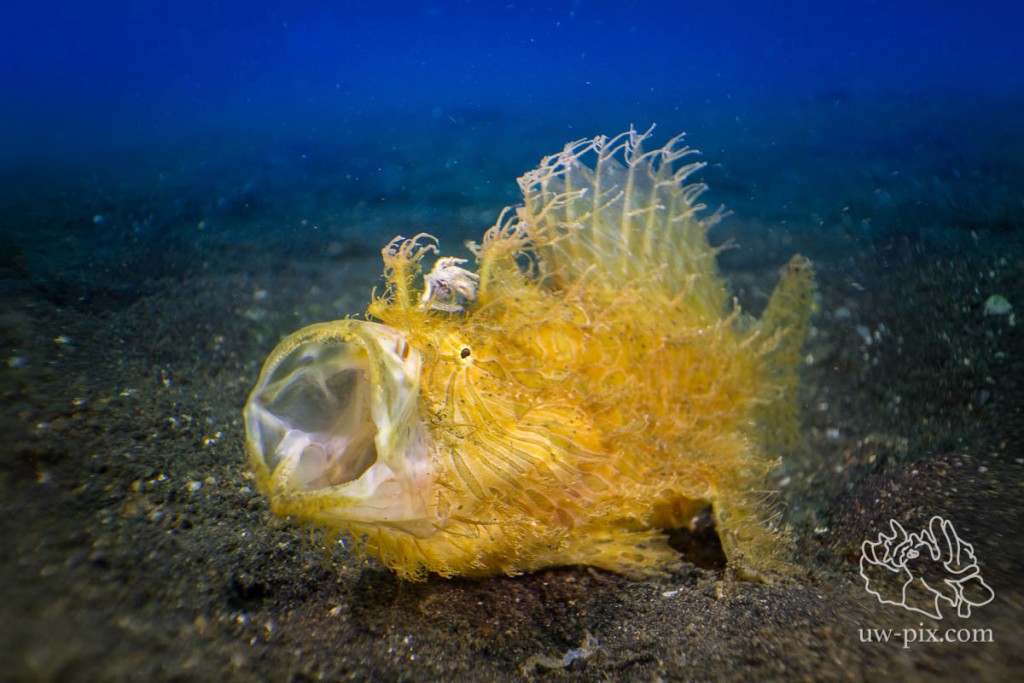
To get behavior shots like yawning, you have to be patient (and of course lucky), frogfish often open their mouths a little bit only just seconds before the real yawn, so try to be ready for the shot and have your settings right. Take a couple test shots and when you have your exposure right, then wait. Of course don’t wait too long if there are other divers waiting for their turn to see/photograph the frogfish.
Hairy frogfish (Antennarius striatus) yawning – Canon 7D, 60mm macro
CFWA Hairy frogfish (Antennarius striatus) yawning – Canon 7D, 60mm macro, CFWA wet-lens (that’s why there are blurry edges), f5.6, 1/200sec, ISO160, 2x SOLA 4000
Even if frogfish usually don’t move much and seem to be relaxed, never harass them (the same goes for every creature underwater). We often see frogfishes in the same spots for many months, but if they’re harassed, they move away and future divers cannot get a glimpse of the weird and wonderful world of frogfishes.